How to use Oobabooga with Ozeki on Windows
Learn how to create powerful offline chatbots using Ozeki in just a few minutes. This guide covers every step—from installation and model setup to API testing and configuration—making it easy to access and use your chatbot within the Ozeki application. Perfect for beginners to offline AI chatbots, all you need is a Windows device, a capable GPU, and an internet connection to get started.
What is Oobabooga WebUI?
Oobabooga WebUI is a simple interface for running AI models locally. It enables you to load, test, and interact with language models directly from your browser, ideal for creating custom chatbots and offline AI use.
How to use Oobabooga with Ozeki on Windows? (Quick Steps)
To use Oobabooga with Ozeki:
- Install Python 3.0 onto your device
- Download Oobabooga installer from Github
- Install Oobabooga and select your GPU type
- Download an AI model from Huggingface
- Apply the model in the webui
- Enable its API and test its with Postman
- Create an AI model in Ozeki AI Studio
- Connect the AI model to a chat bot in Ozeki AI Studio
- Enable its connection and start using it
Overview
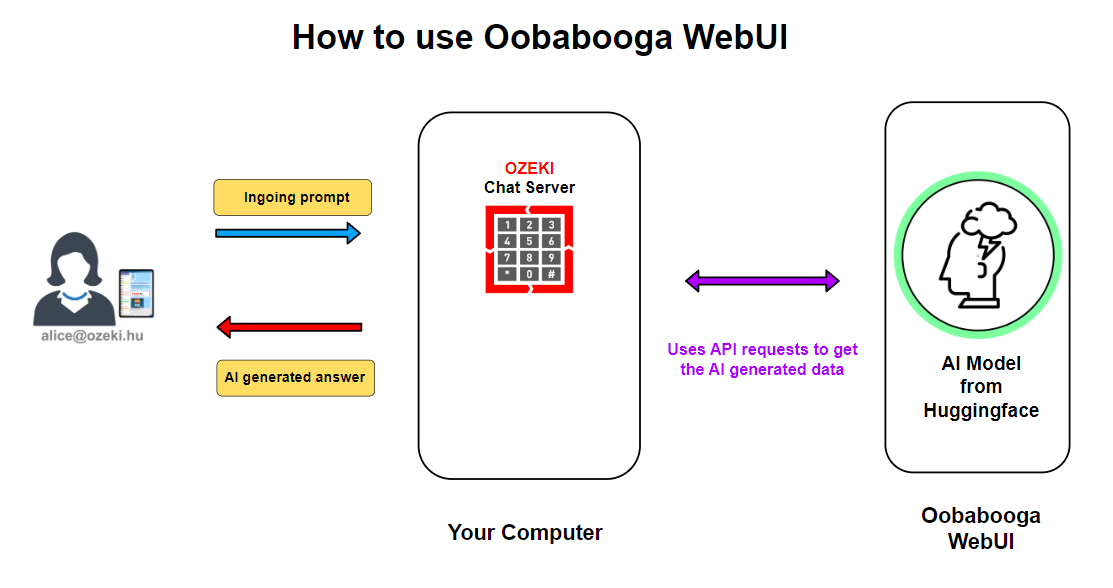
The user sends a prompt to the Ozeki Chat Server, which connects to the Oobabooga WebUI using API requests to process the input with an AI model from Hugging Face. The AI-generated response is then sent back to the user. This setup allows seamless chatbot functionality on your computer.
How to install Python 3.0? (Video Tutorial)
To install Oobabooga, you’ll first need the latest version of Python. This short video provides a step-by-step guide, starting from downloading Python from its website to completing the installation for a fully functional setup.
Step 1 - Download the Python 3.0 installer
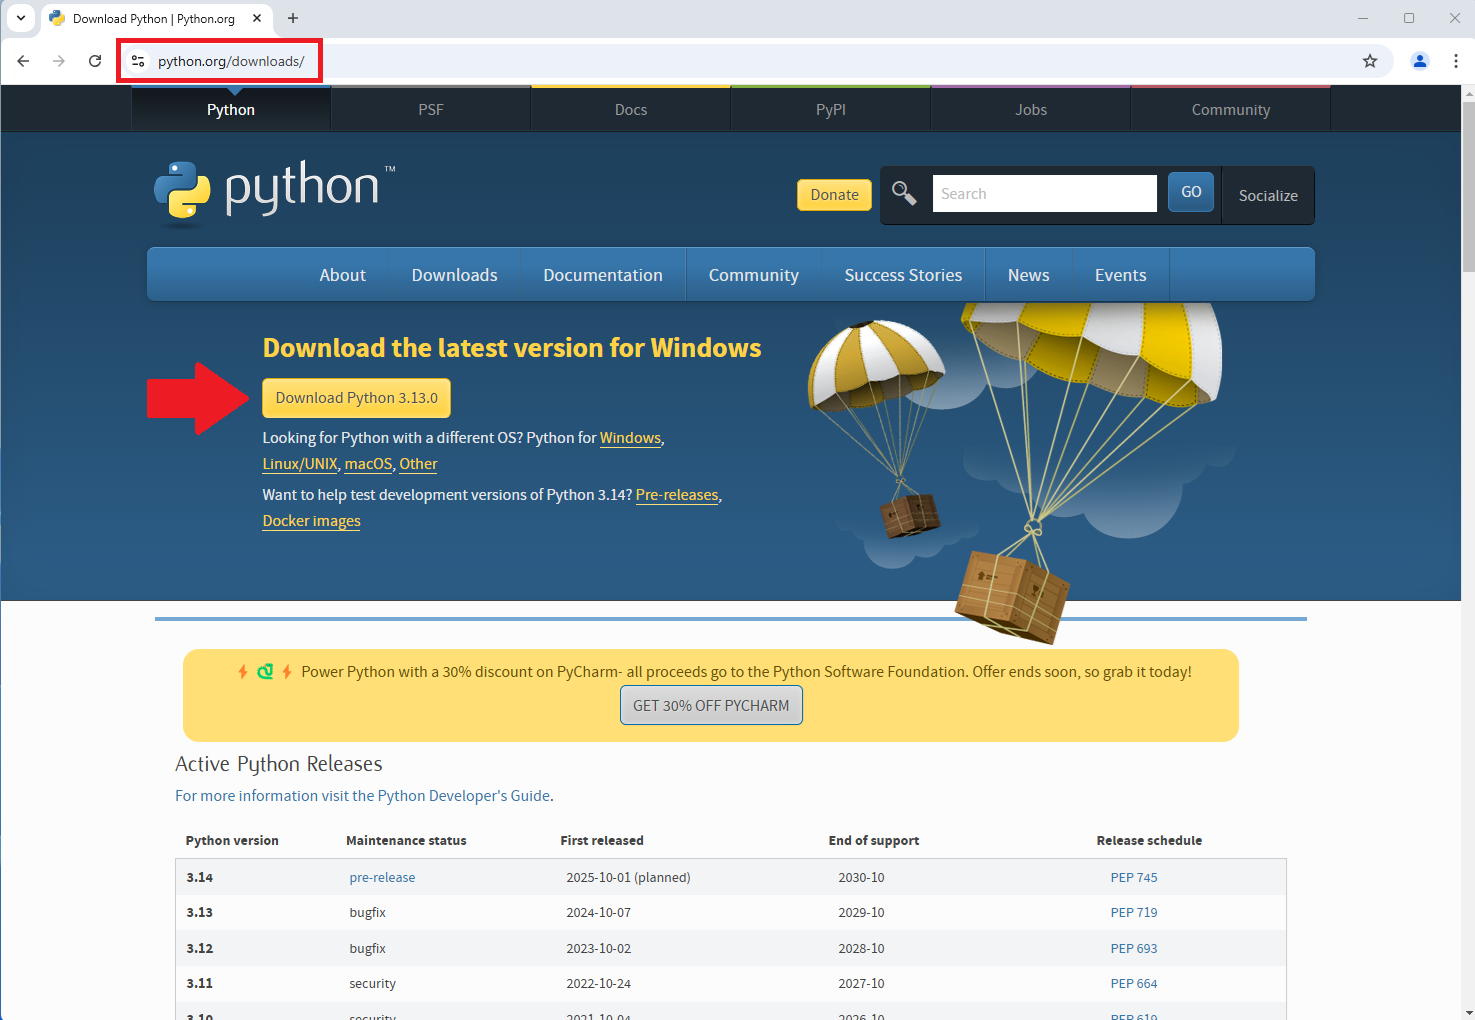
Go to python.org/downloads and click the download button in the center of the page to get the installer. Once downloaded, you're ready to begin the installation process. Look at Figure 2 for visual help.
Step 2 - Add python.exe to path and start the install
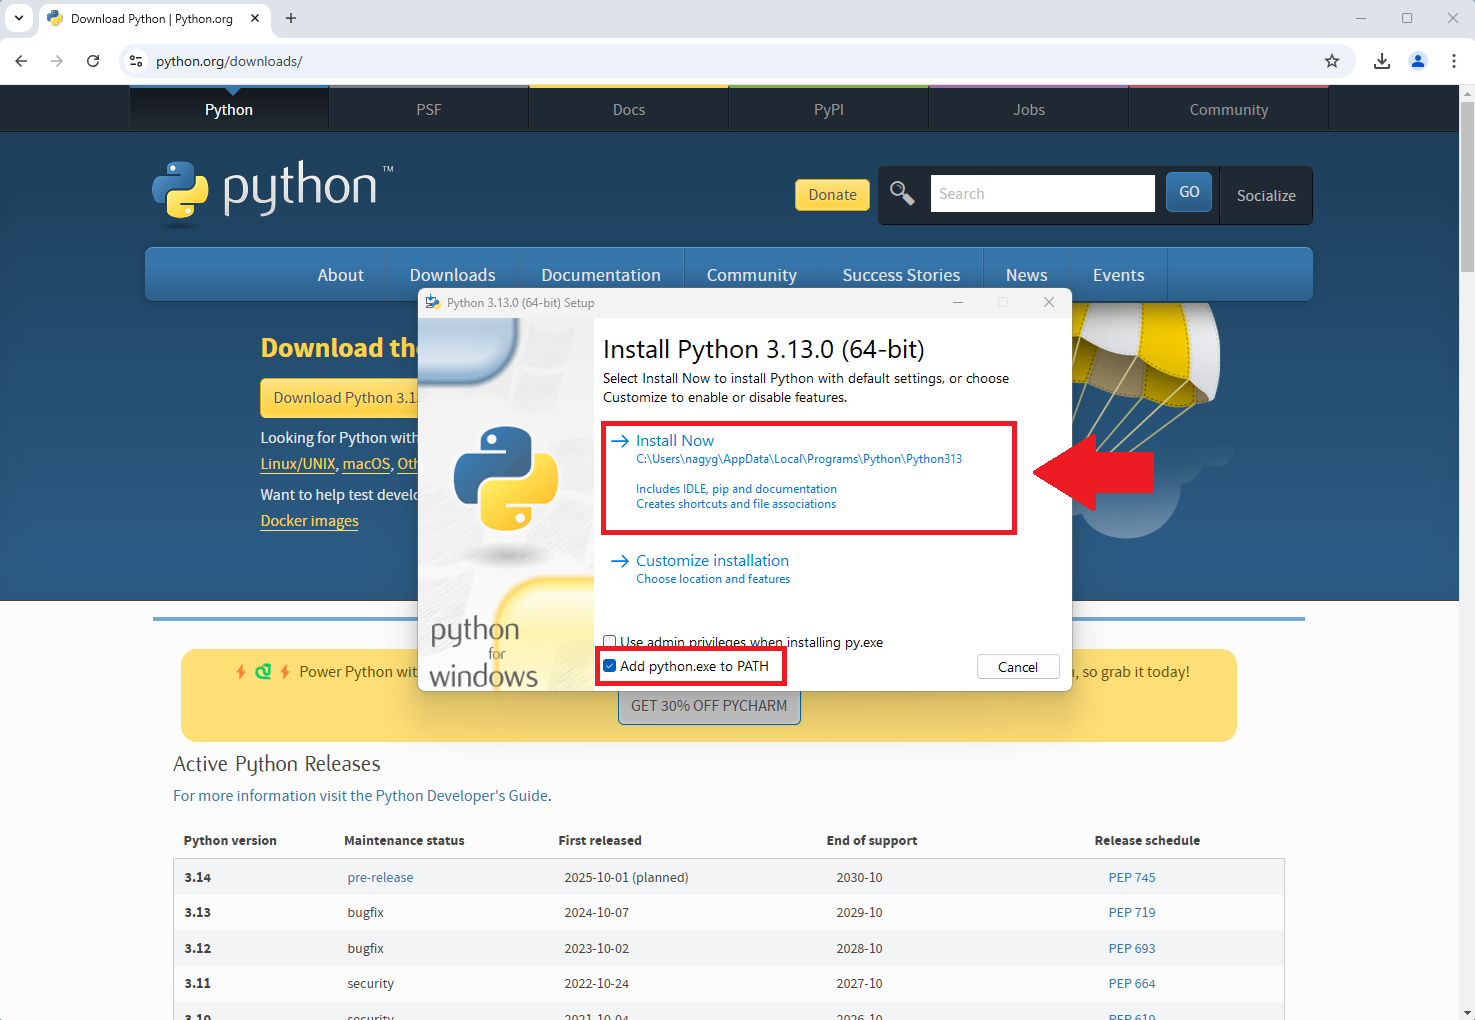
Before installing, check the box shown in Figure 3 to add Python to the PATH variables, ensuring the system can locate it. Then, click the install button to begin the installation process.
Step 3 - Disable path length limit and finish installation
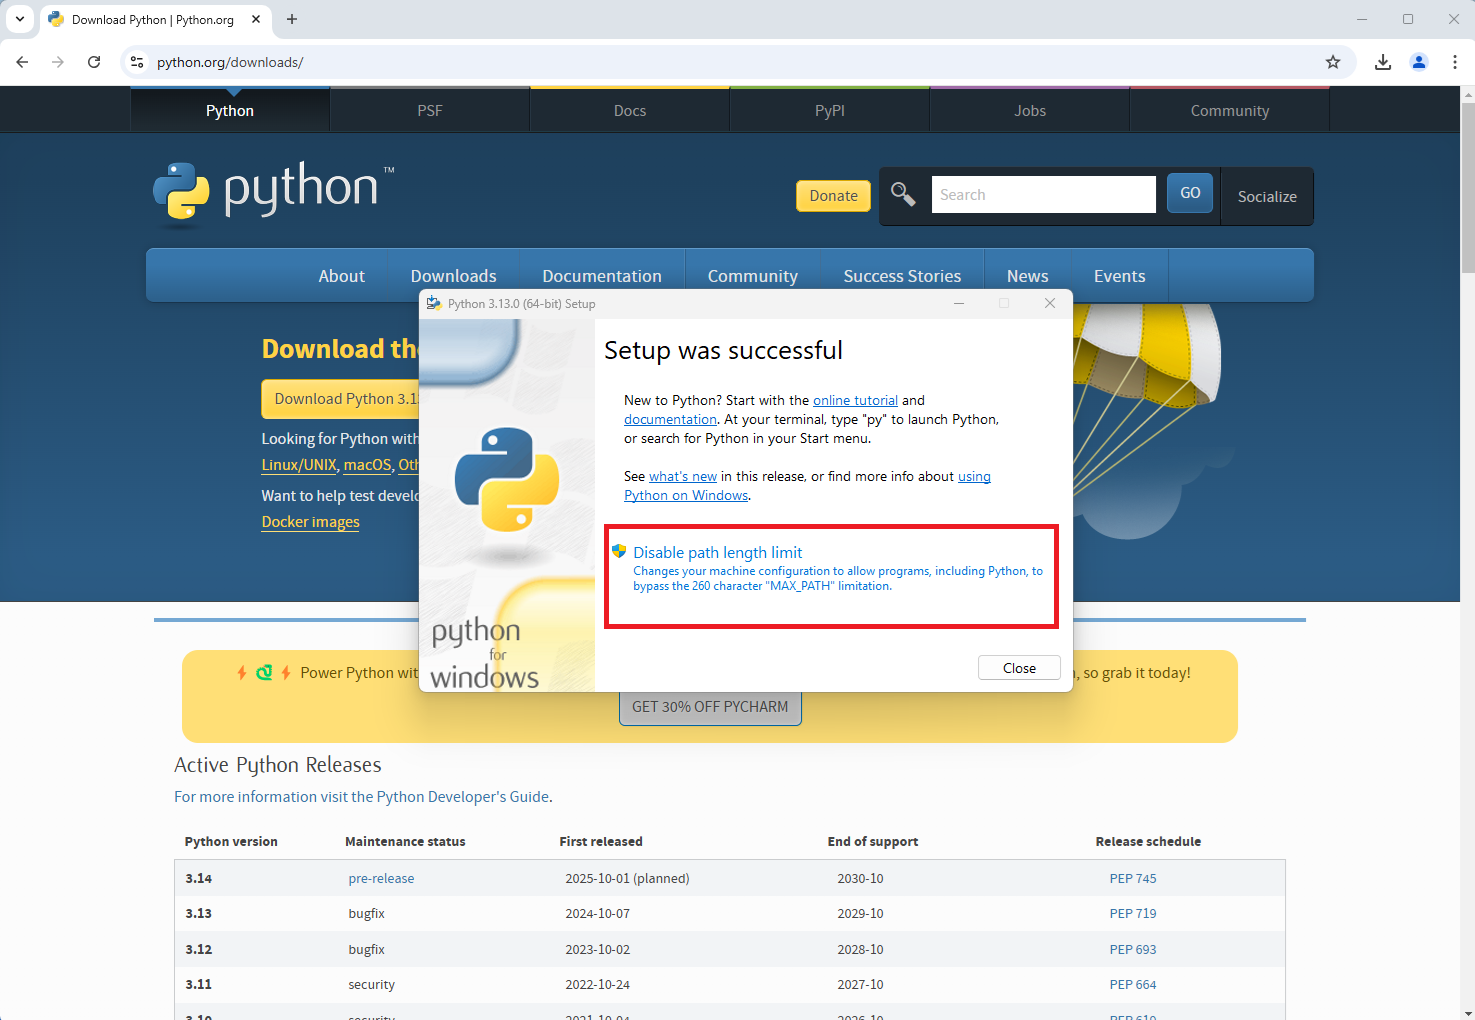
Before finishing the installation, make sure to click on the "Disable path length limit" button (as shown in Figure 4). This is crucial, as Oobabooga requires this option to be disabled in order to function properly. Then, click "Finish" to complete the installation.
How to download and install the Oobabooga webui? (Video Tutorial)
Now that Python is installed, it's time to set up the Oobabooga WebUI, which provides a user-friendly interface for configuring your chatbot. To begin, head to the GitHub repository. Below, you'll find a video guide to make the process even easier.
Step 1 - Download Oobabooga from Github
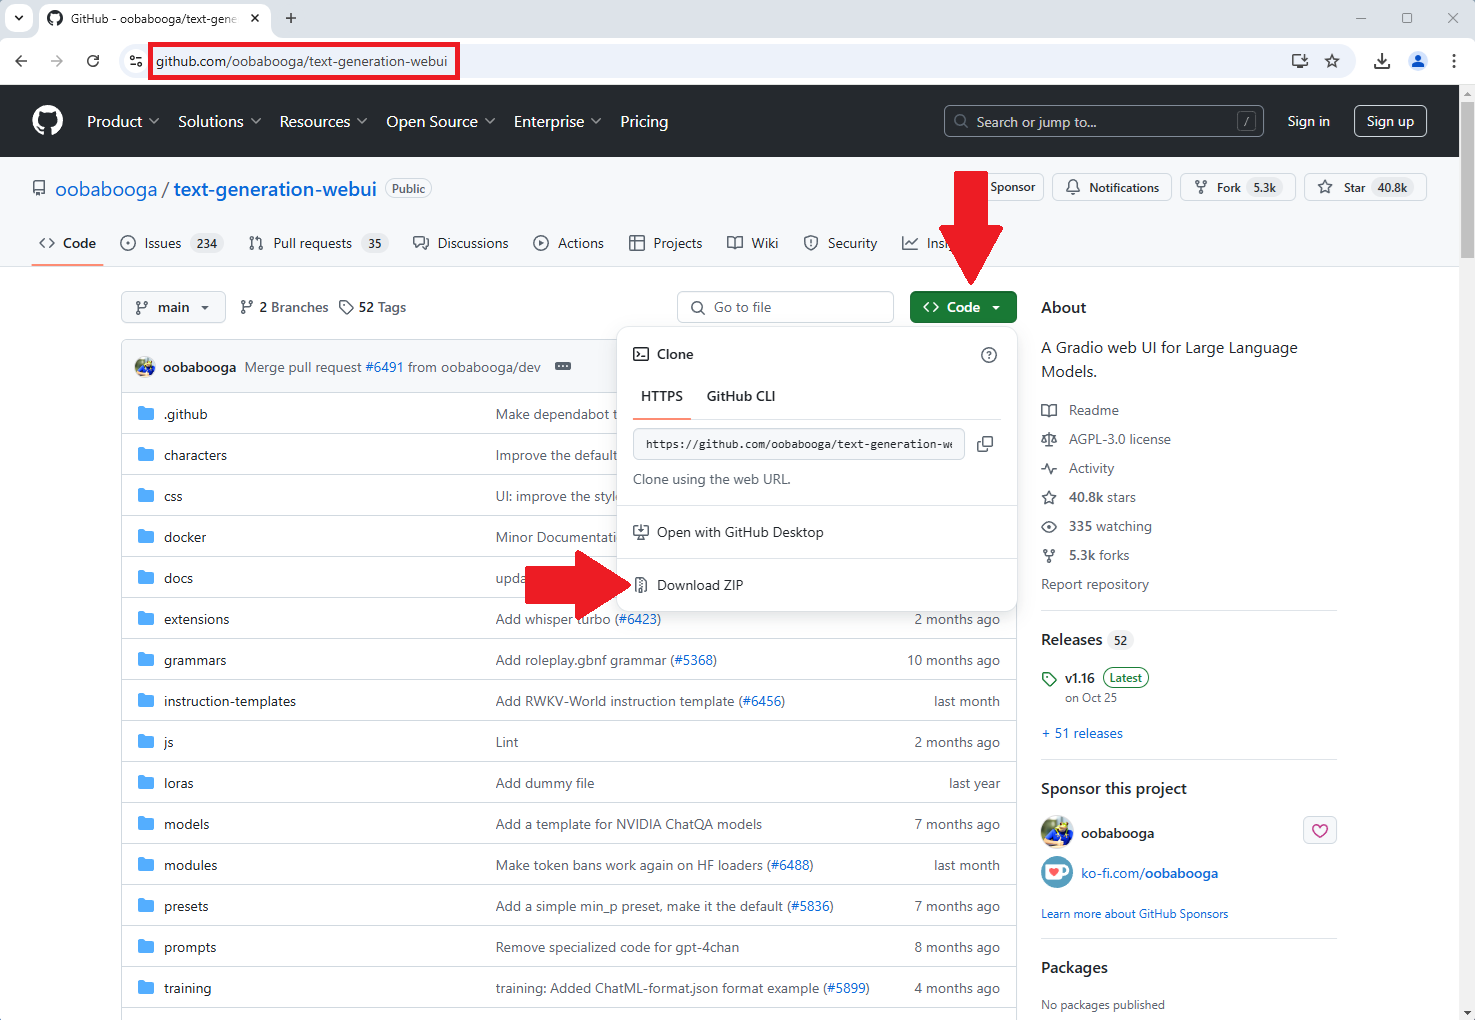
Head to github.com/oobabooga/text-generation-webui and click the green "Code" button. In the drop-down menu, select "Download ZIP" to download the compressed repository file. Once downloaded, you can use it on your computer. Take a look at Figure 5 if you need further assistance.
Step 2 - Extract the zip file
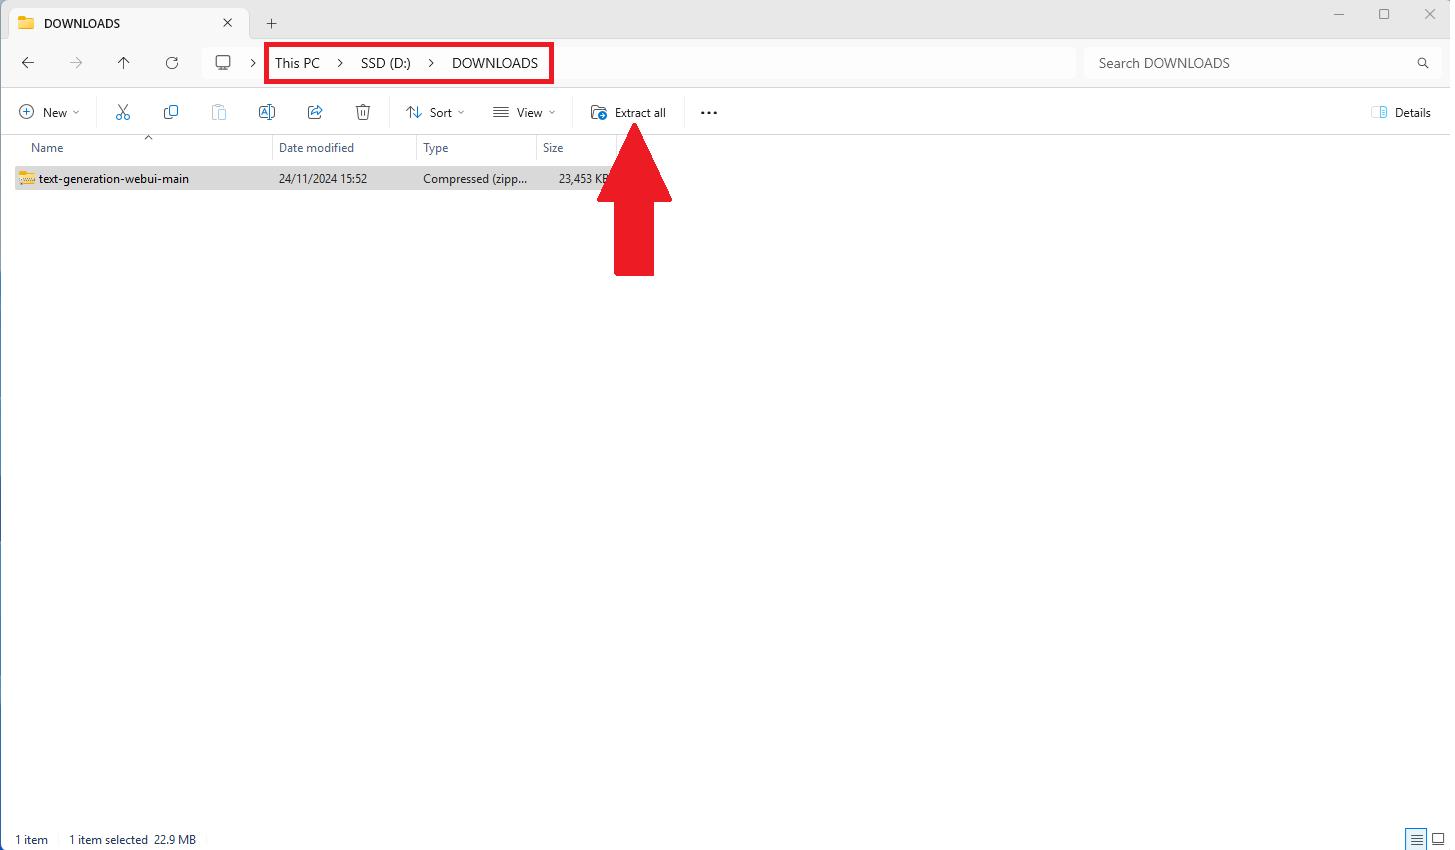
To extract the folder, go to your Downloads folder and select the downloaded ZIP file. Then, click the "Extract All" button in the toolbar. Figure 6 will guide you on where to find this option.
Step 3 - Start Oobabooga WebUI
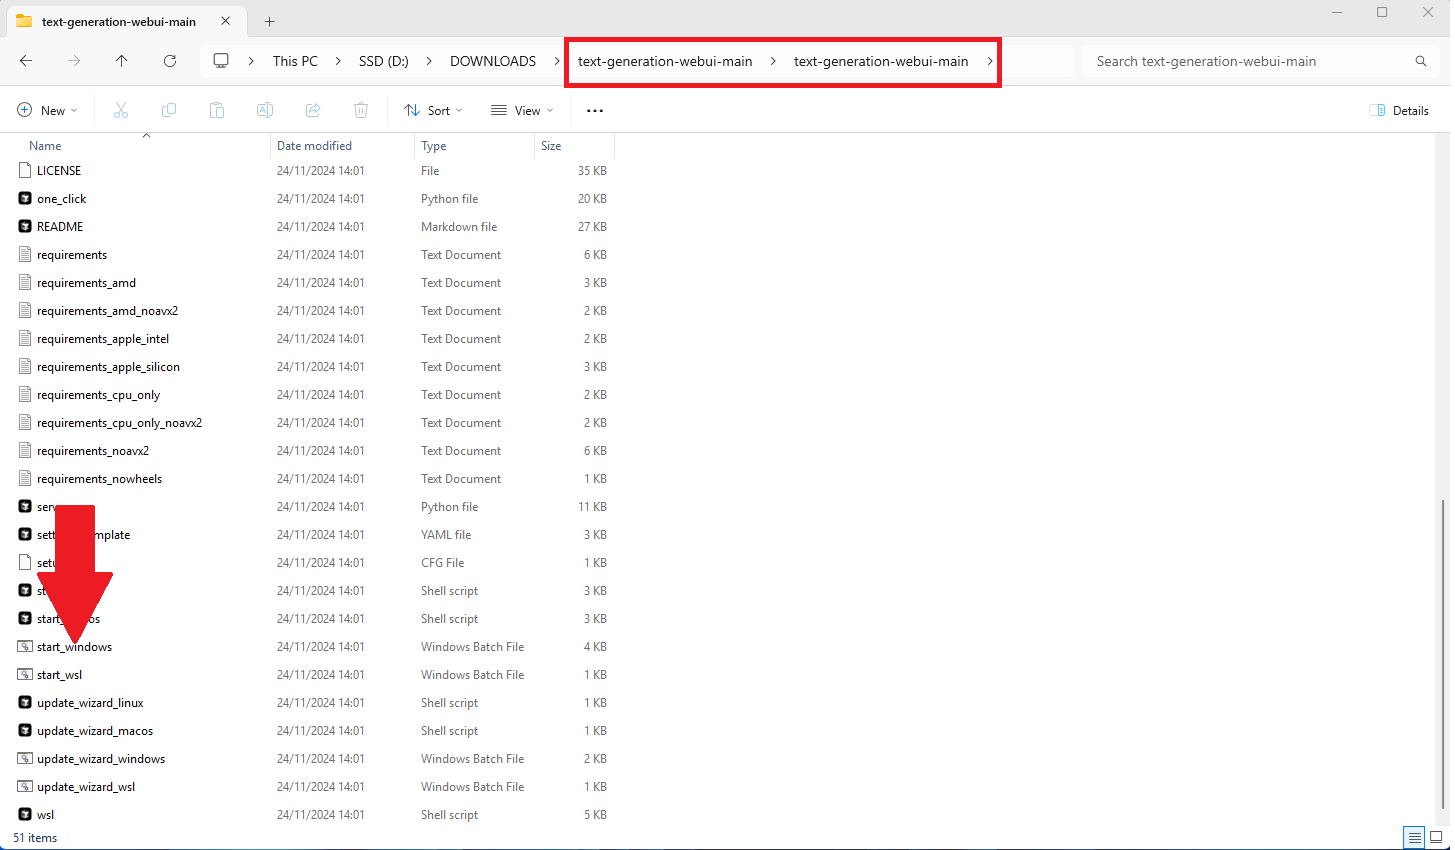
Open the extracted folder and locate the file named "start_windows". Double-click on it to begin the installation process for Oogabooga. Figure 7 will assist you in identifying the file.
Step 4 - Input your GPU type
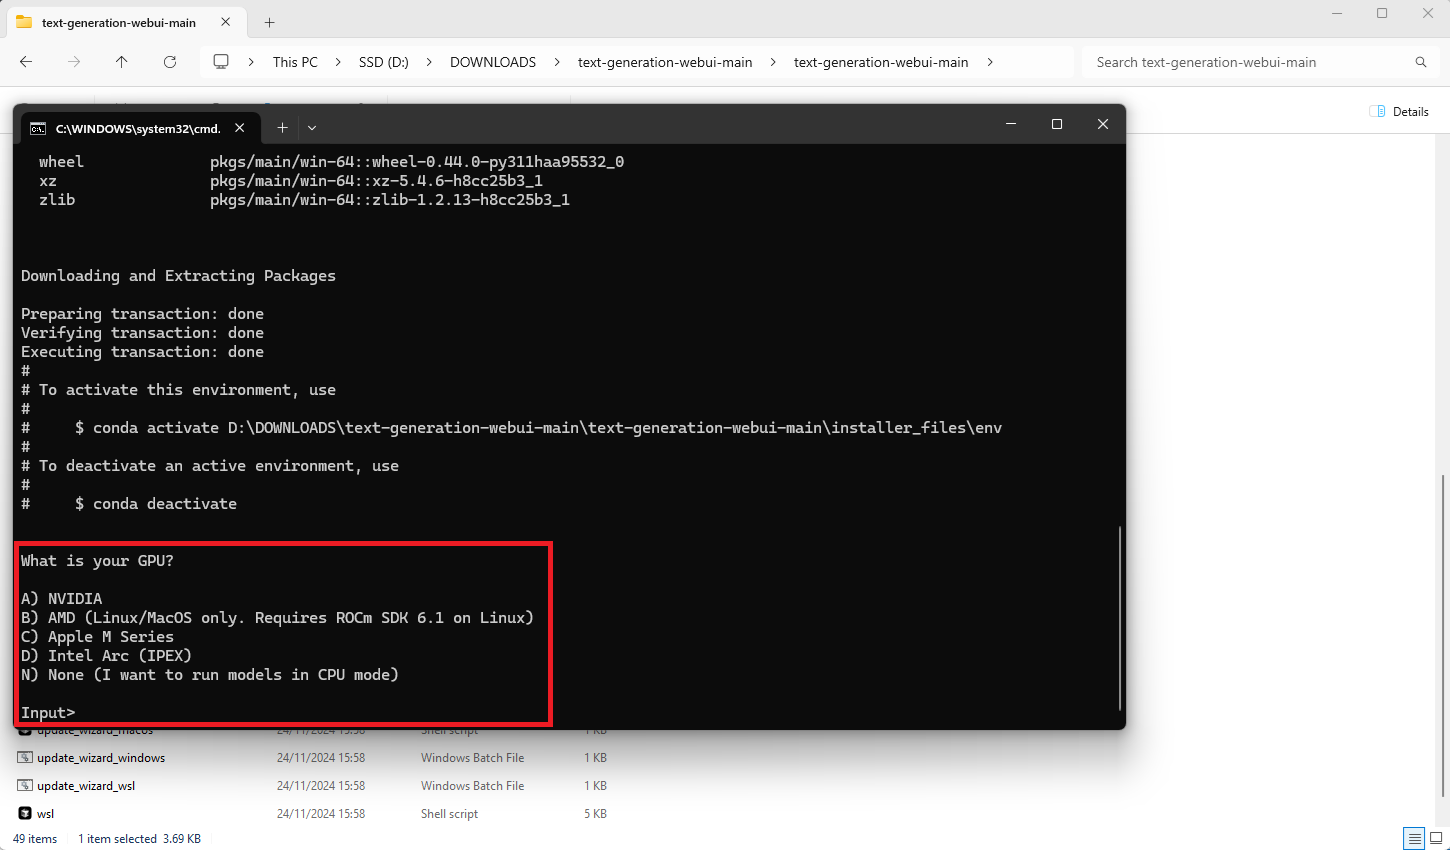
Input your graphics card type to proceed. If you're unsure, ask your system administrator or select "N" for none, which will use your computer's processor instead. Keep in mind that using the processor may affect the speed of the model, depending on your CPU. Figure 8 helps you visualize it.
Step 5 Open the WebUI
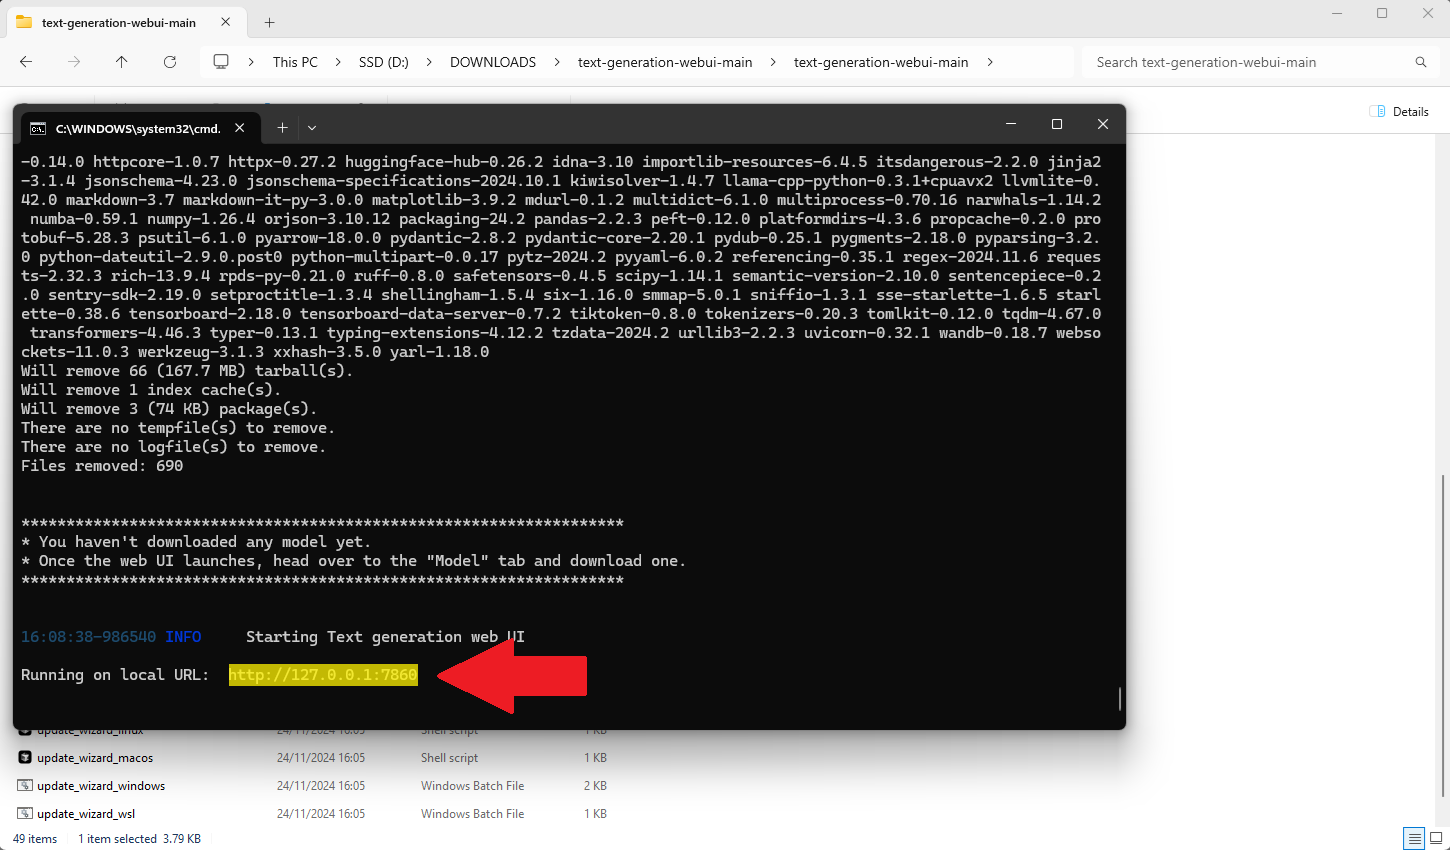
Copy the URL displayed at the end of the installation and paste it into your browser. This will launch your own web server for Oogabooga. Figure 9 will guide you through this step.
How download and apply an AI model in the webui? (Video Tutorial)
To use the chatbot, we need an AI model for it to interact with. Huggingface is an ideal platform for this. You can use your own, but in this guide, we'll use the Mistral-7B-Instruct-v0.2-GGUF model to get started.
Step 1 - Select the AI model
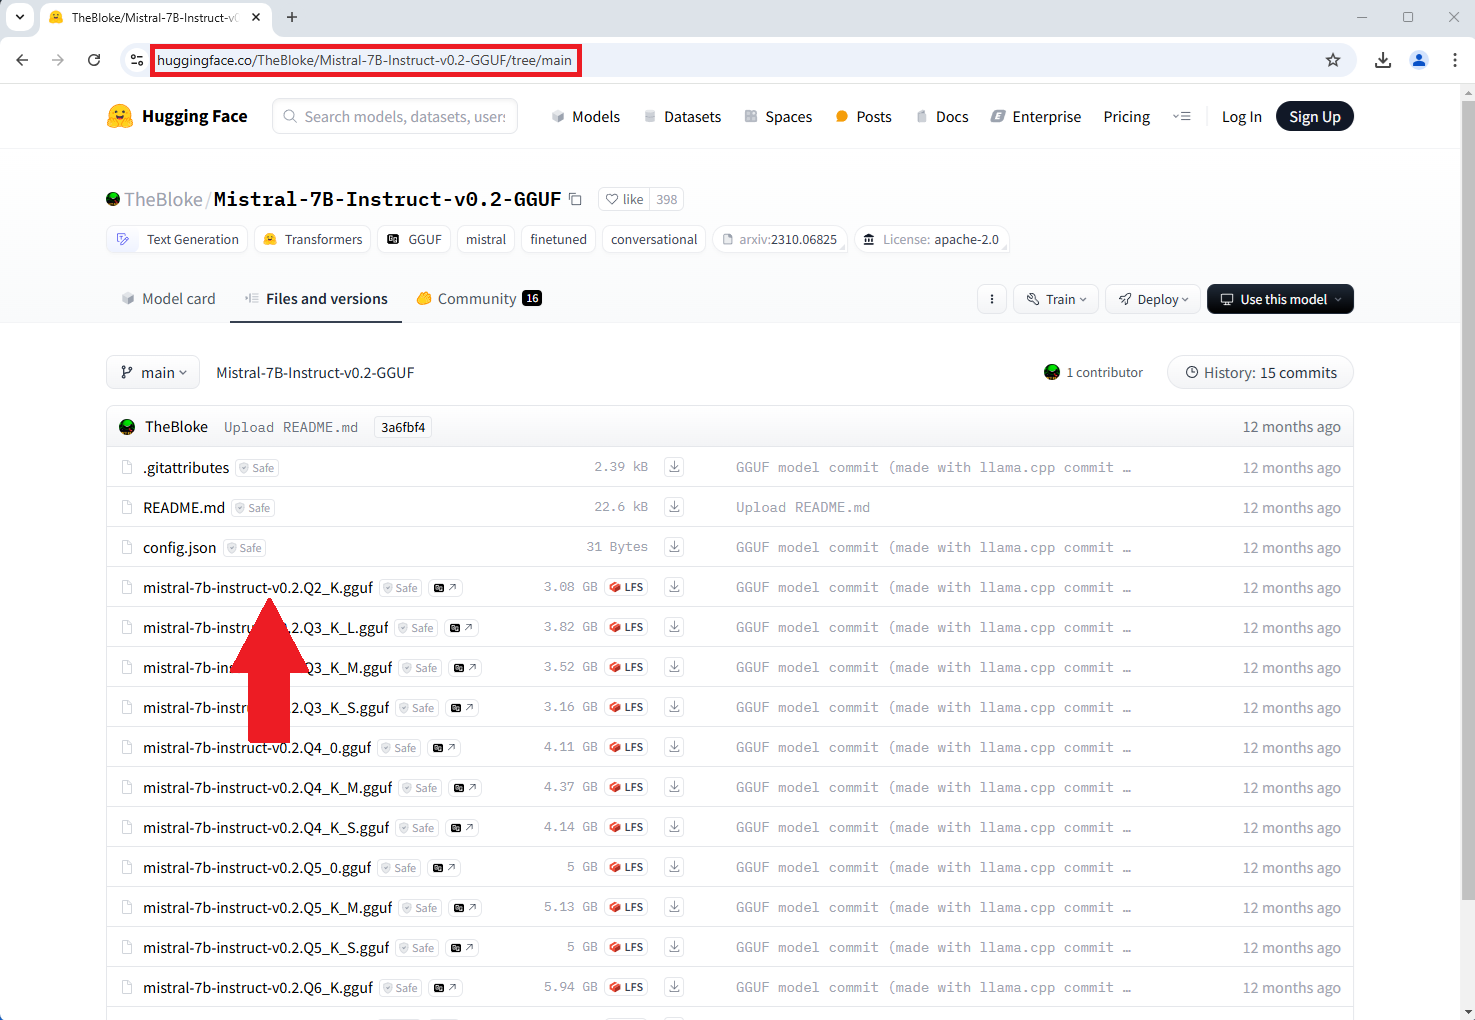
Go to huggingface.co/TheBloke/Mistral-7B-Instruct-v0.2-GGUF/tree/main and choose your desired AI model. Click on it to proceed. Look at Figure 10 if you need more help.
Step 2 - Download the AI model
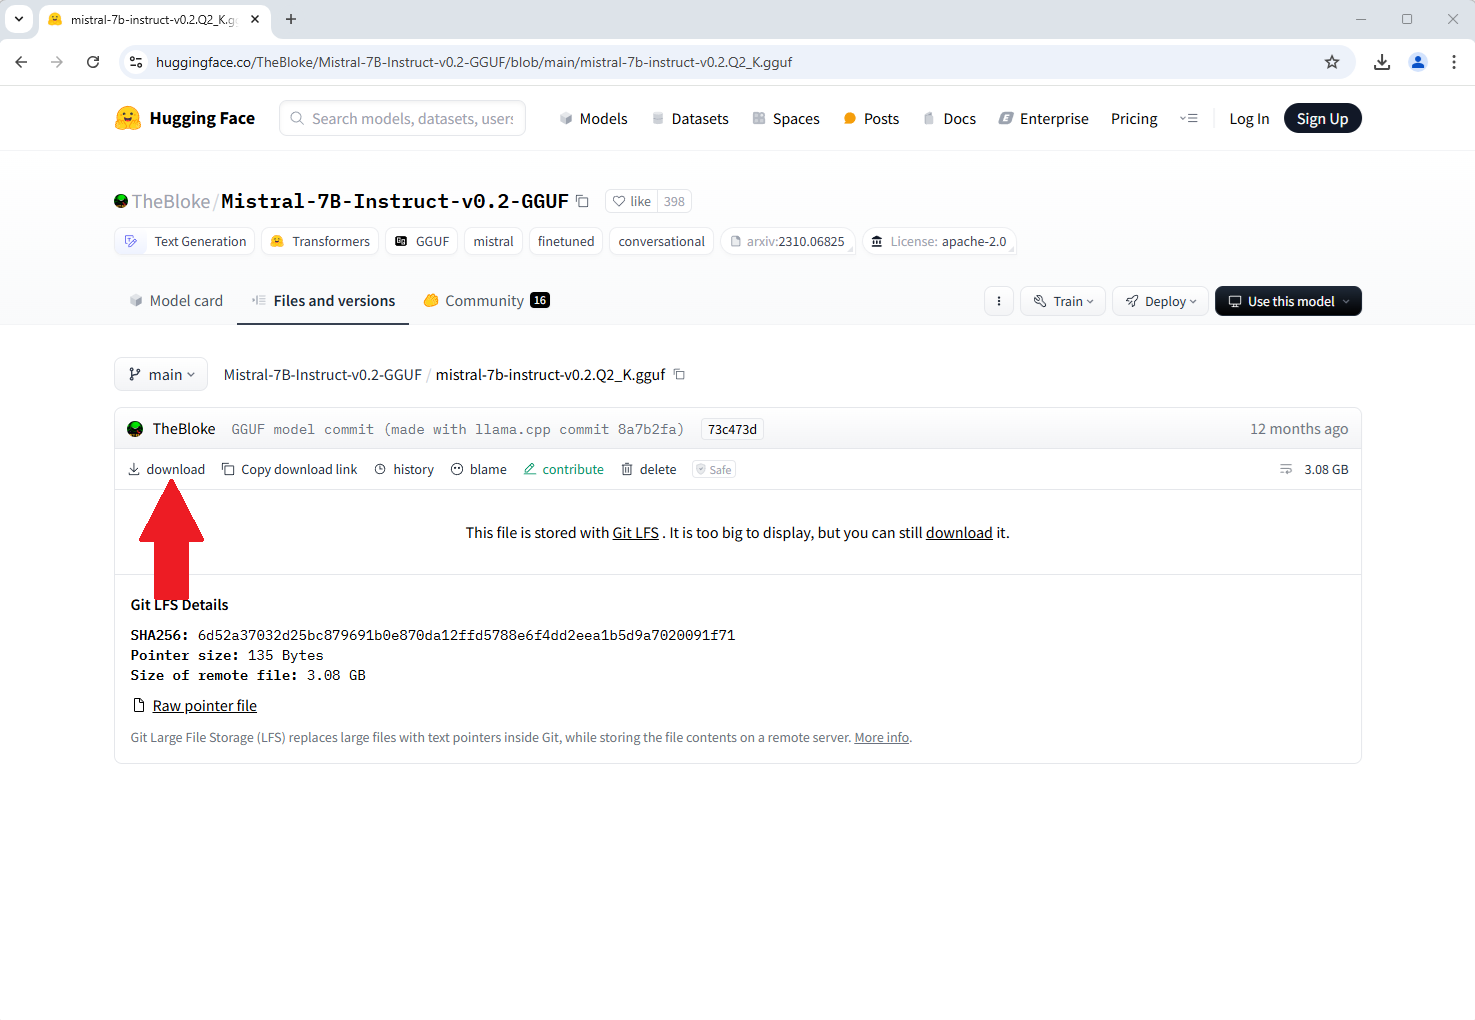
Click the download button located on the middle-left of your screen to start downloading the model to your computer. (As shown in Figure 11)
Step 3 - Copy your model
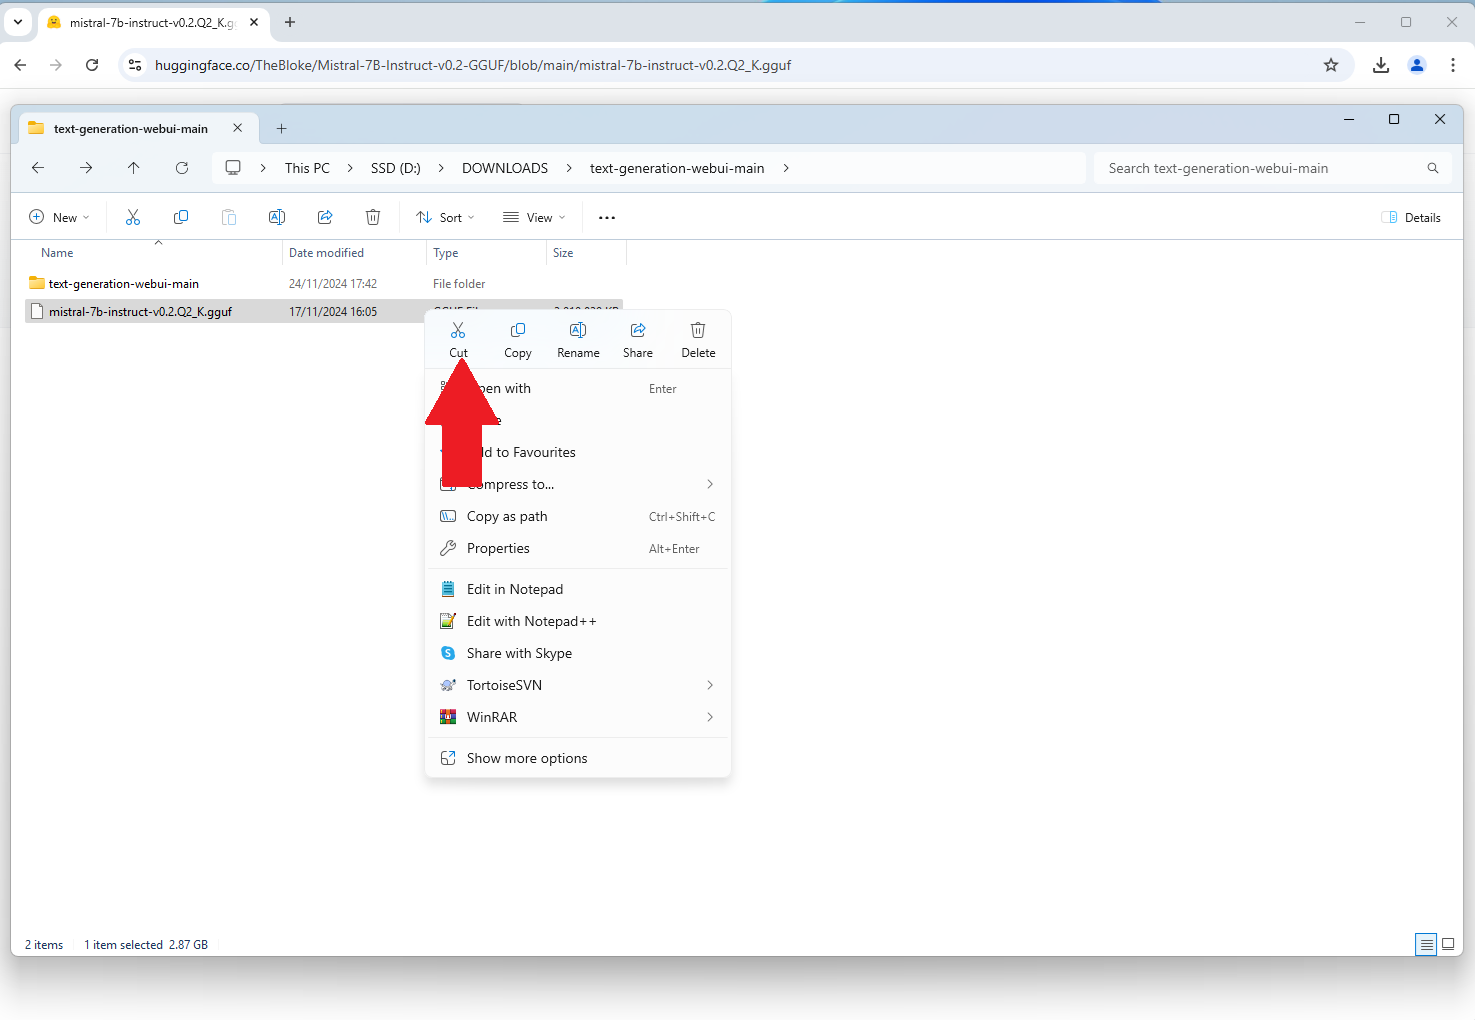
Locate your newly downloaded model, right-click on it to open the options, and select "Cut" to copy the model. Figure 12 helps you with to complete this step.
Step 4 - Paste your model into the right folder
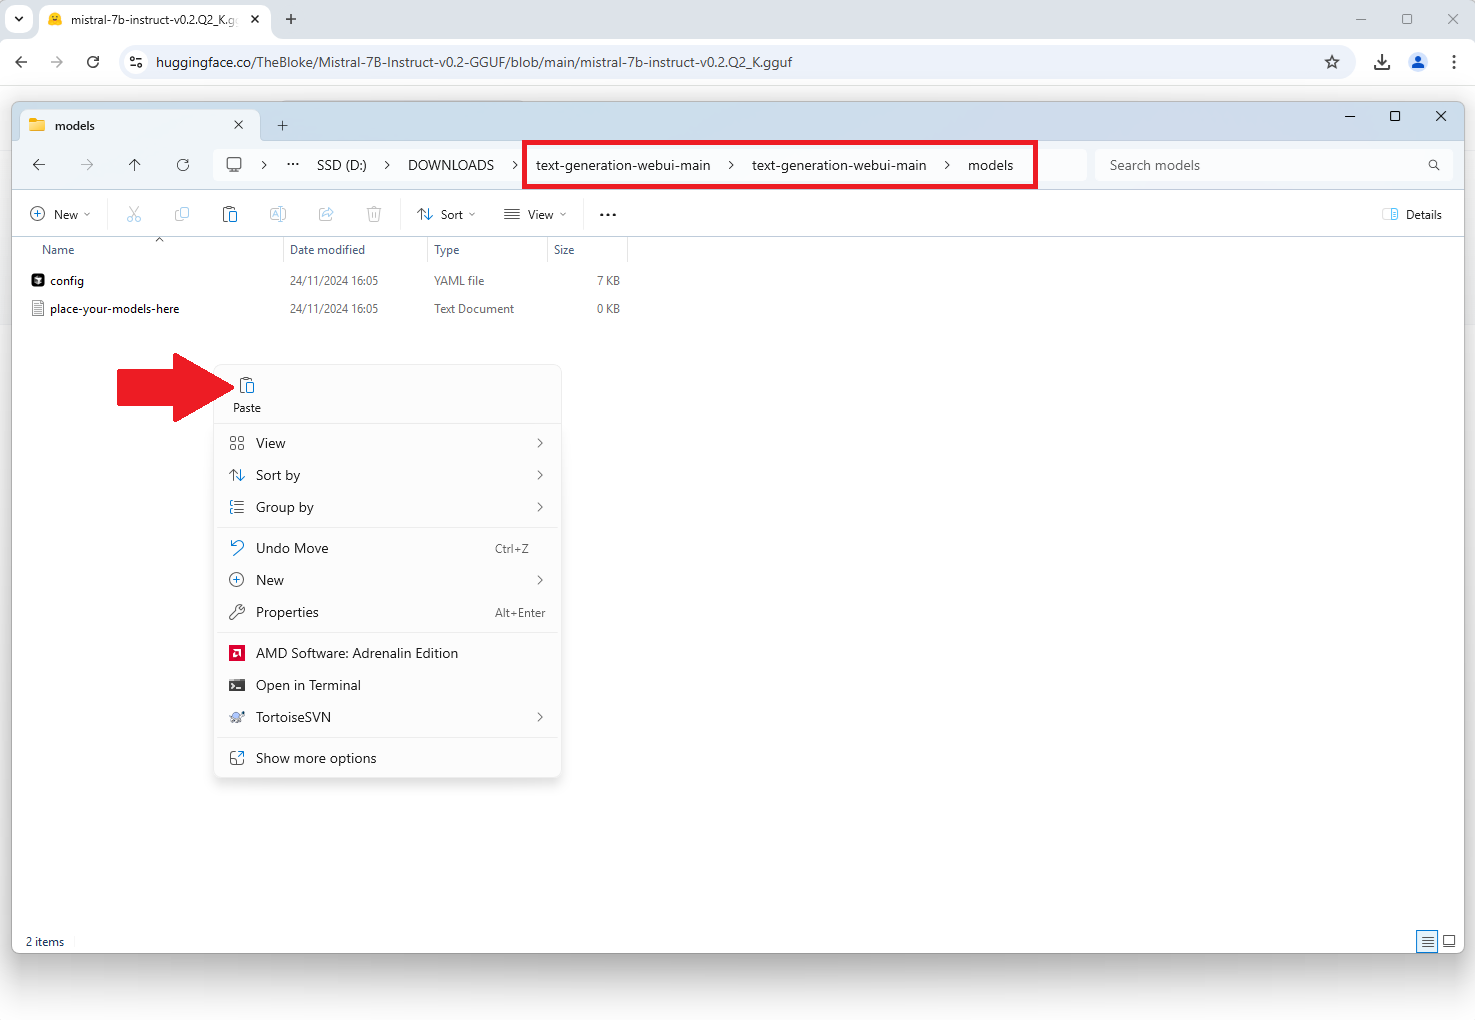
Locate the "models" folder and open it. Then, right-click inside the folder and select "Paste" to add your model. This will make your model available for use with the web UI. Use Figure 13 as a visual guide.
Step 5 - Start the WebUI
Start your web UI by locating the "start_windows" file and double-clicking it to run. Once initialization is complete, copy the URL provided and paste it into your web browser. Figure 14 shows you how to do it.

Step 6 - Load the model
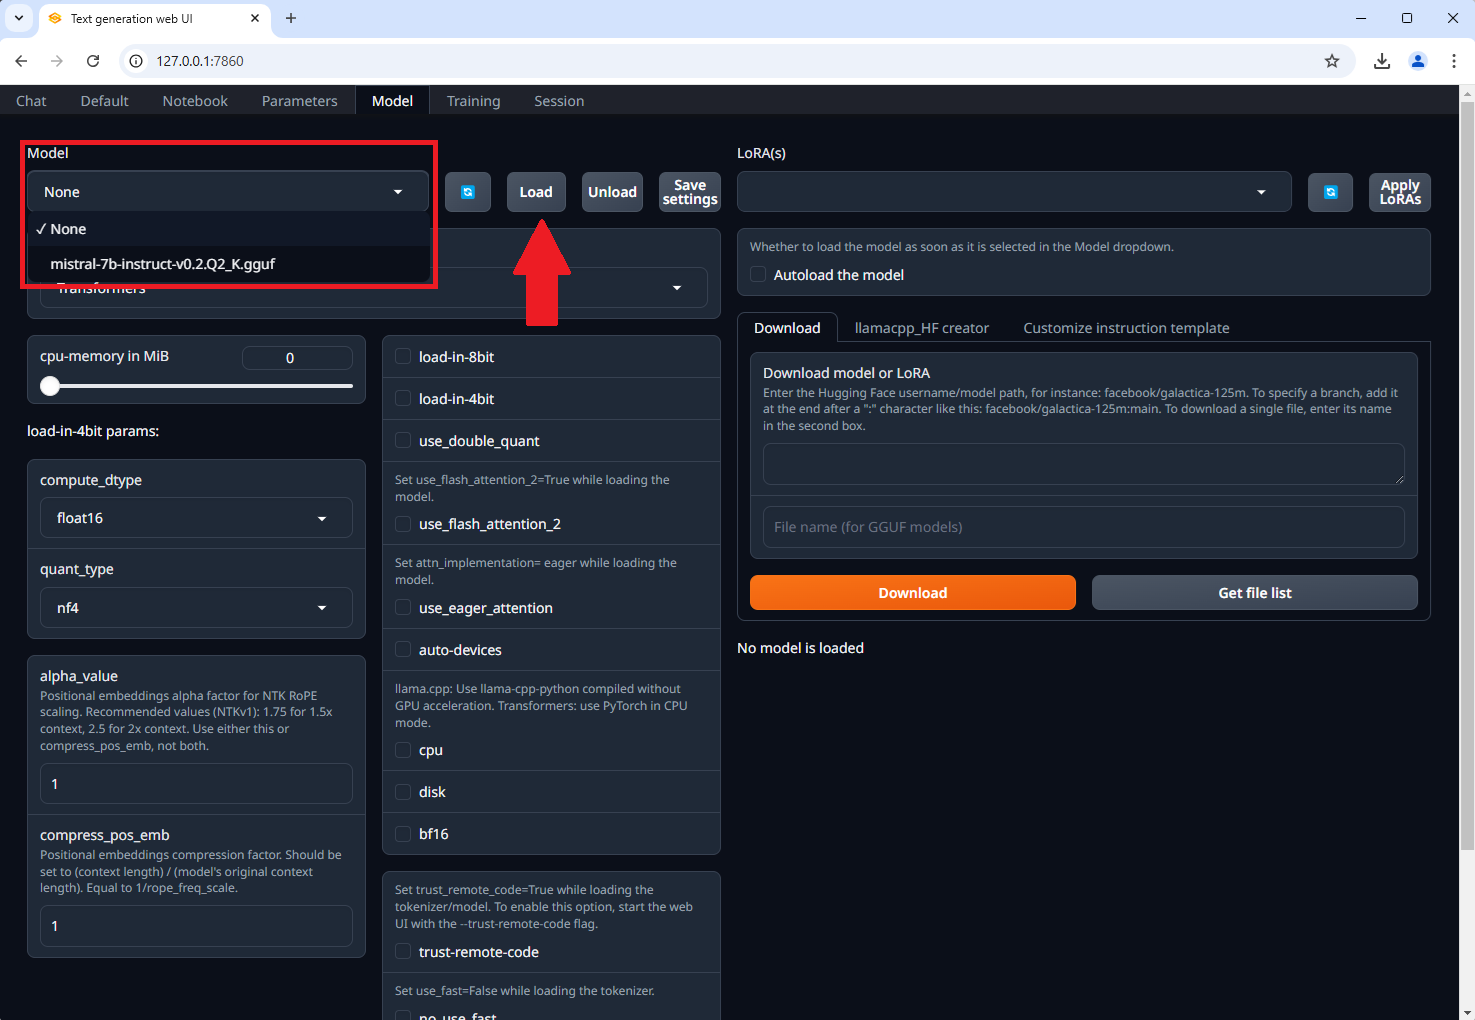
Locate the "Models" tab at the top and click on it. From the dropdown menu, select your downloaded model and click "Load". This will load the model, enabling the web UI to use it. Take a look at Figure 15 for an example.
How to enable and test the chat bot's API using Postman? (Video Tutorial)
To use the chatbot outside of the WebUI, we need to enable its API. To check if it's live, we'll send a test request. In the video below, we walk through enabling the API and successfully sending a test request using Postman.
Step 1 - Open the flags text file
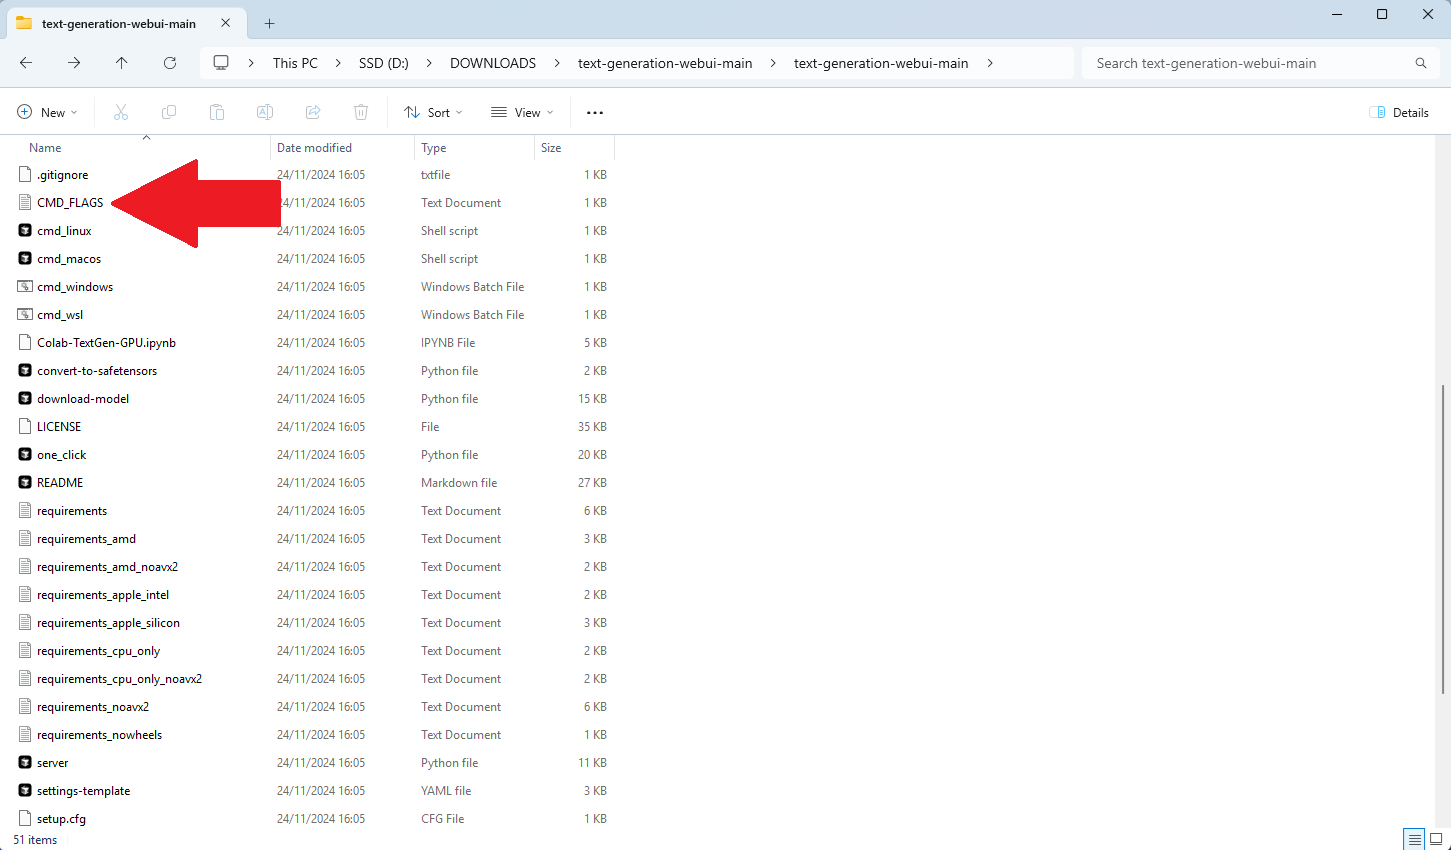
Locate the CMD_FLAGS text file and open it. This file allows you to customize the options for the webui startup process. Refer to Figure 16 for assistance.
Step 2 - Modify the text file
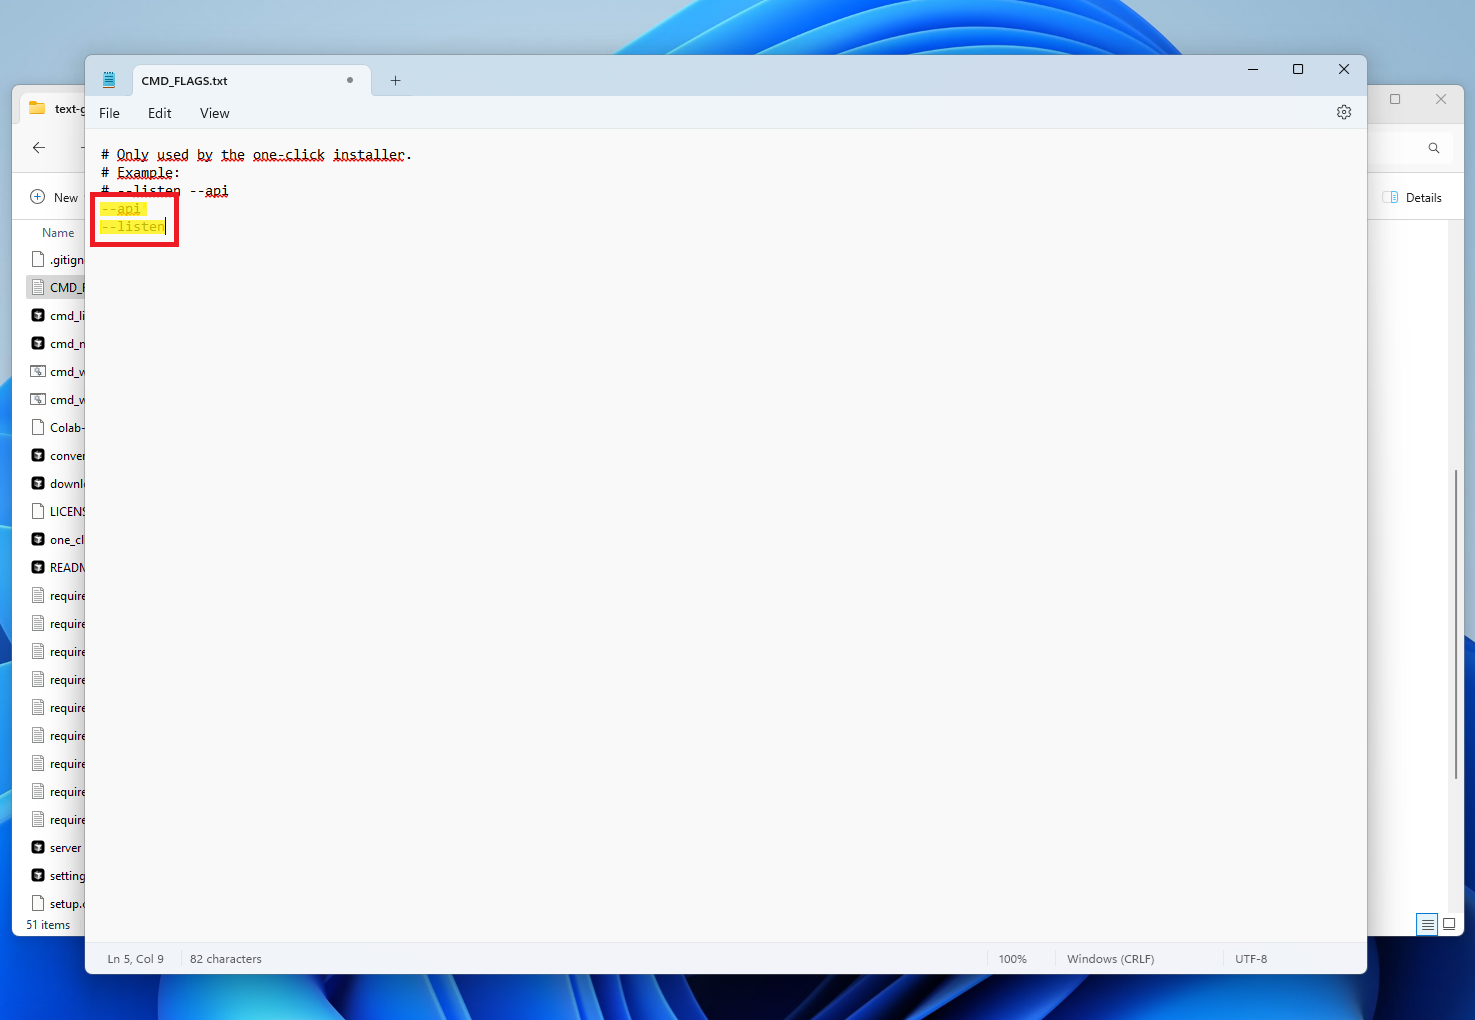
Insert the following commands into the CMD_FLAGS text file:
--api and --listen. Once added, save the file and restart
your webui. These commands ensure that the API starts alongside the
webui. Use Figure 17 for guidance.
--api: starts the api when the webui is started
--listen: logs all the informations in the command prompt
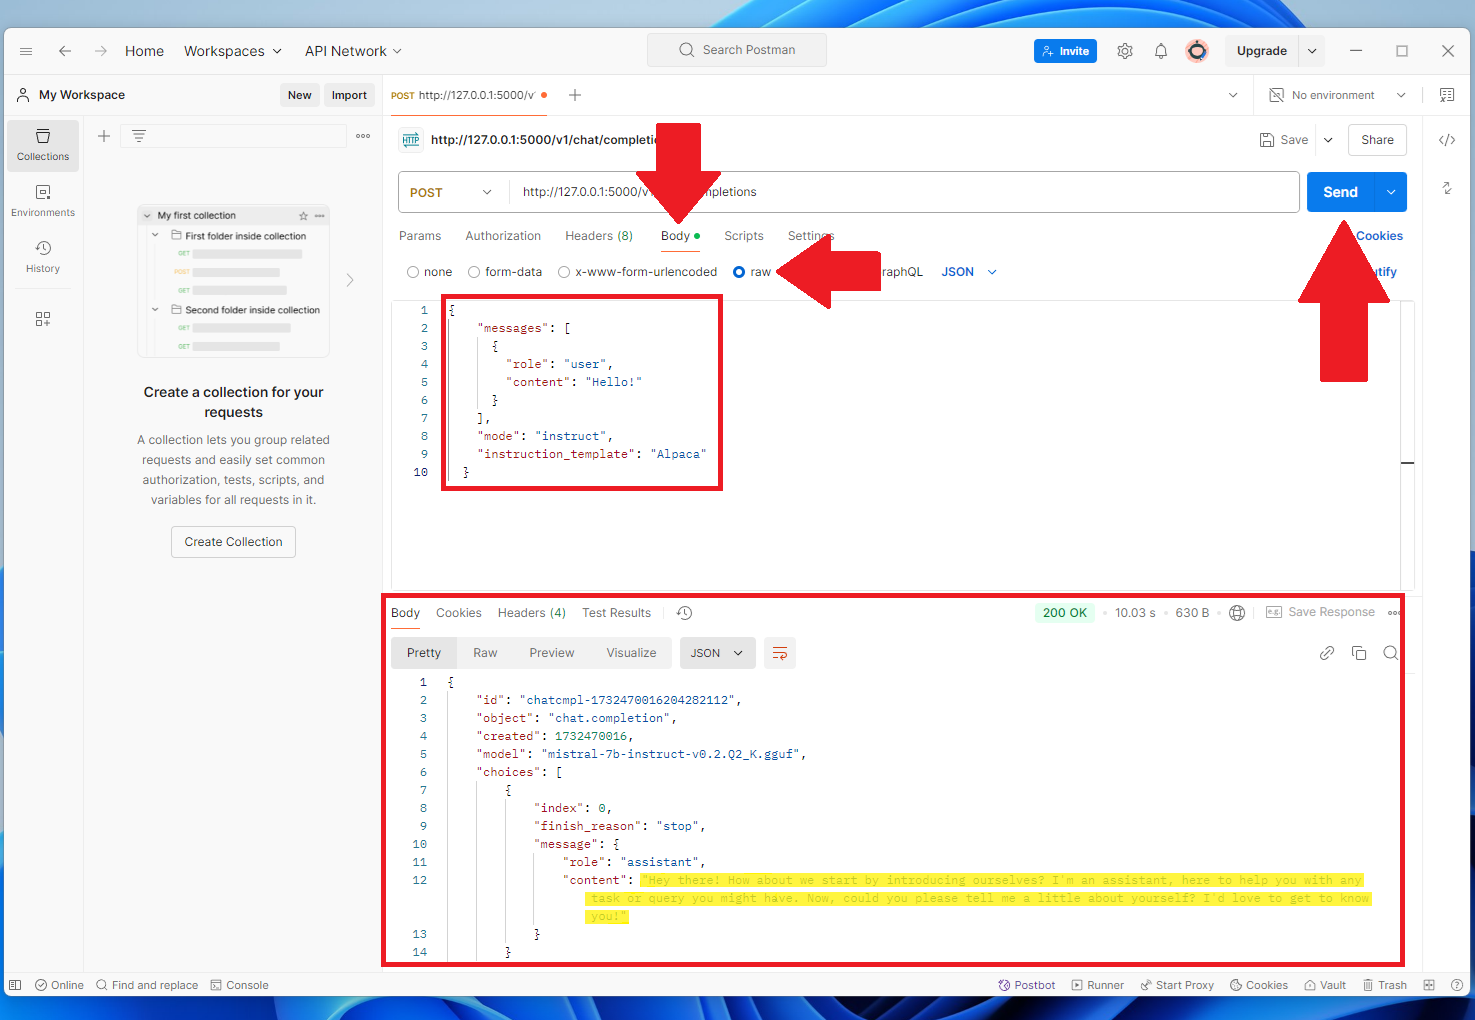
Step 3 - Create the request and receive data
Open Postman and create a new POST request with the provided URL
Next, click on the Body tab below the URL bar and
select the raw option. Paste the provided code into the raw
text area and click Send to execute the request. If you did
everything correctly, you should receive a completed request with usable
data. For additional clarity, refer to Figure 18 as an example.
URL: http://127.0.0.1:5000/v1/chat/completions
(keep that in mind
that the port (5000) could be different for you)
How to use Oobabooga with Ozeki? (Video Tutorial)
In this video, we'll show you how to connect your newly created chatbot with Ozeki AI Studio. This integration will allow you to send messages and receive AI responses directly within Ozeki, making the process easier and more streamlined.
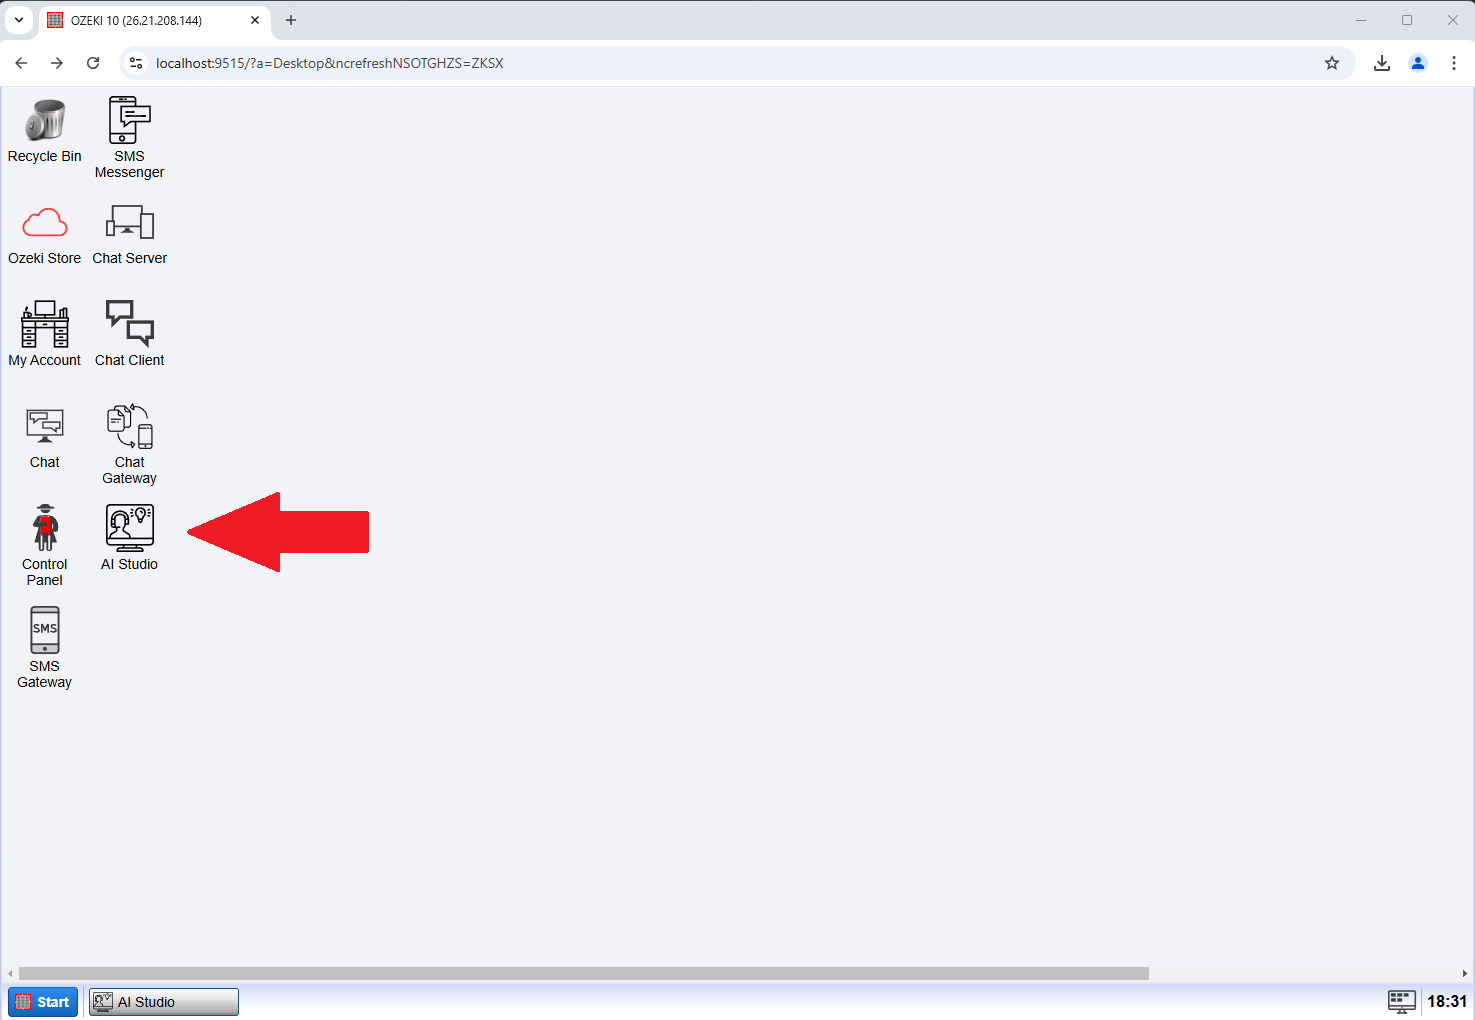
Step 1 - Open the Ozeki AI Stuido
Open the Ozeki desktop app and find the AI Studio icon. Click on it to launch the interface and begin adding your custom AI model and chatbot. For visual guidance, check out Figure 19.
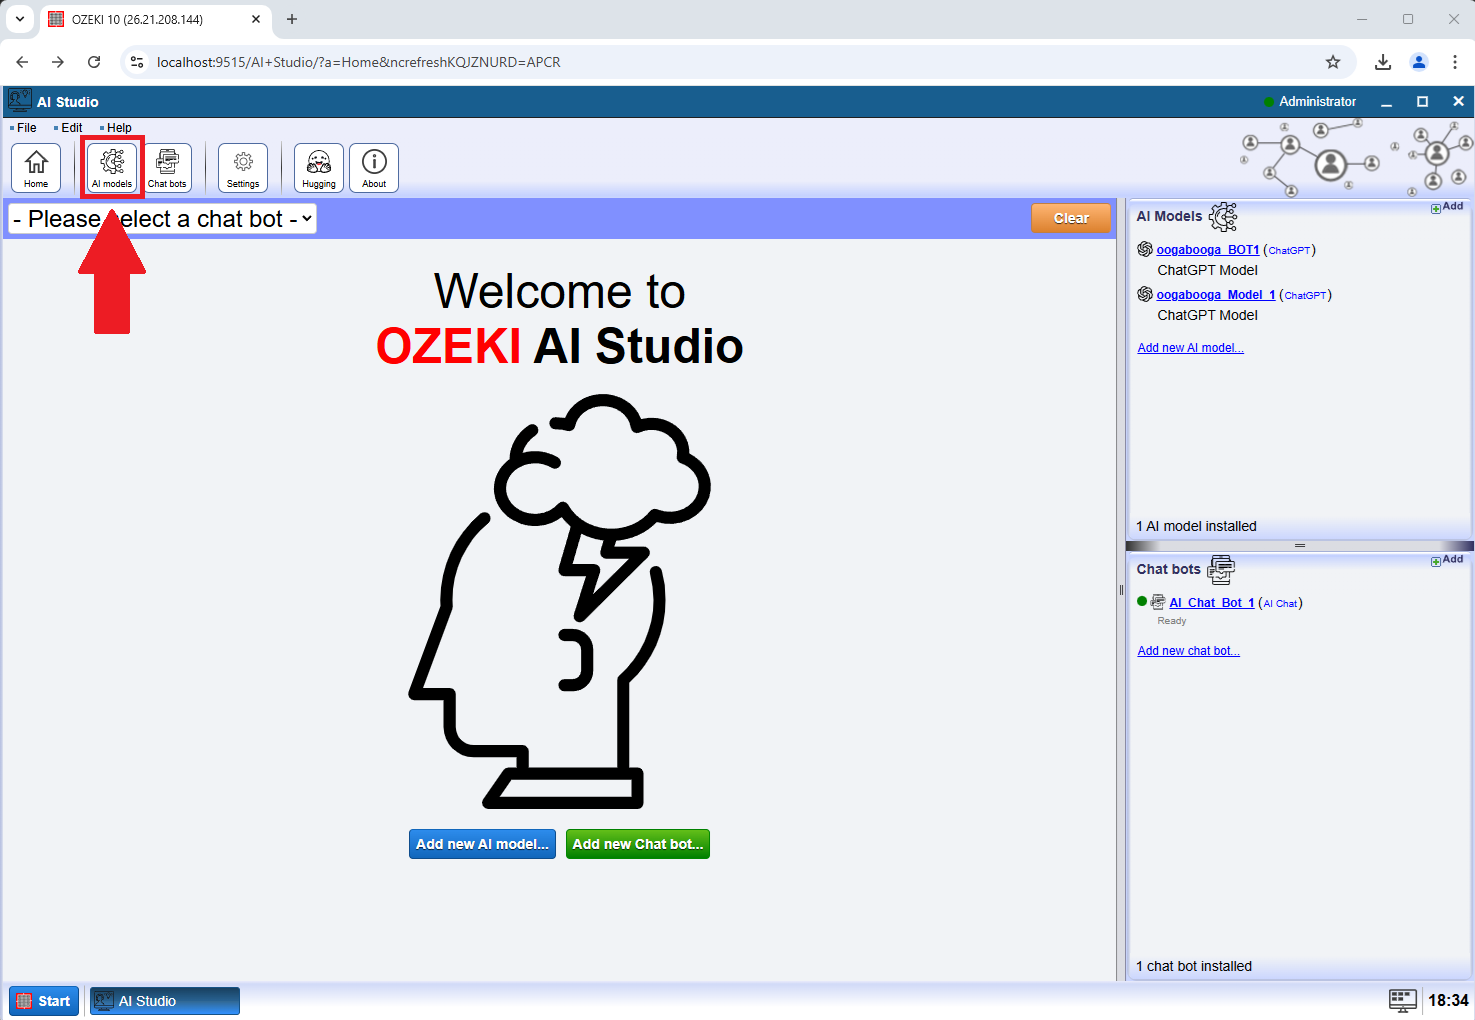
Step 2 - Locate the AI Models button
Select the AI Models button located at the top-left corner of your screen. This will take you to the AI Models page, where you can add your custom AI model. For assistance, refer to Figure 20.
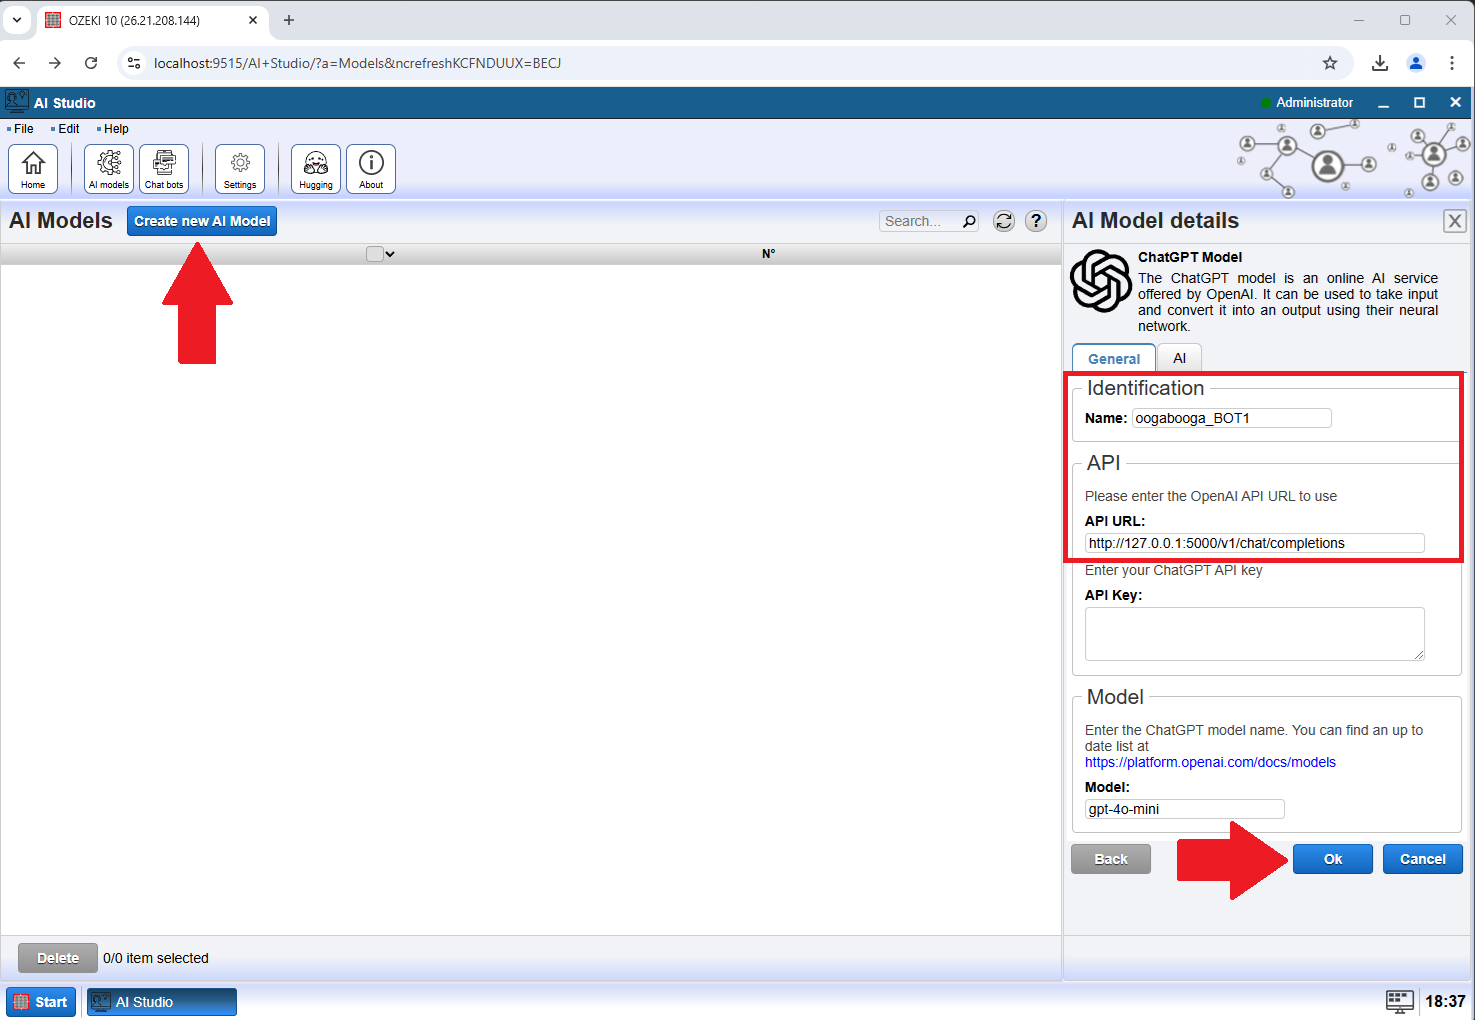
Step 3 - Add your AI Model
Press the Create New AI Model button and fill out the fields on the right side of your screen. In the API section, enter the URL used during the API testing part of this tutorial. Once all the fields are completed, press OK to proceed. Figure 21 is available if you need further guidance.
Step 4 - Add a chatbot and configure it
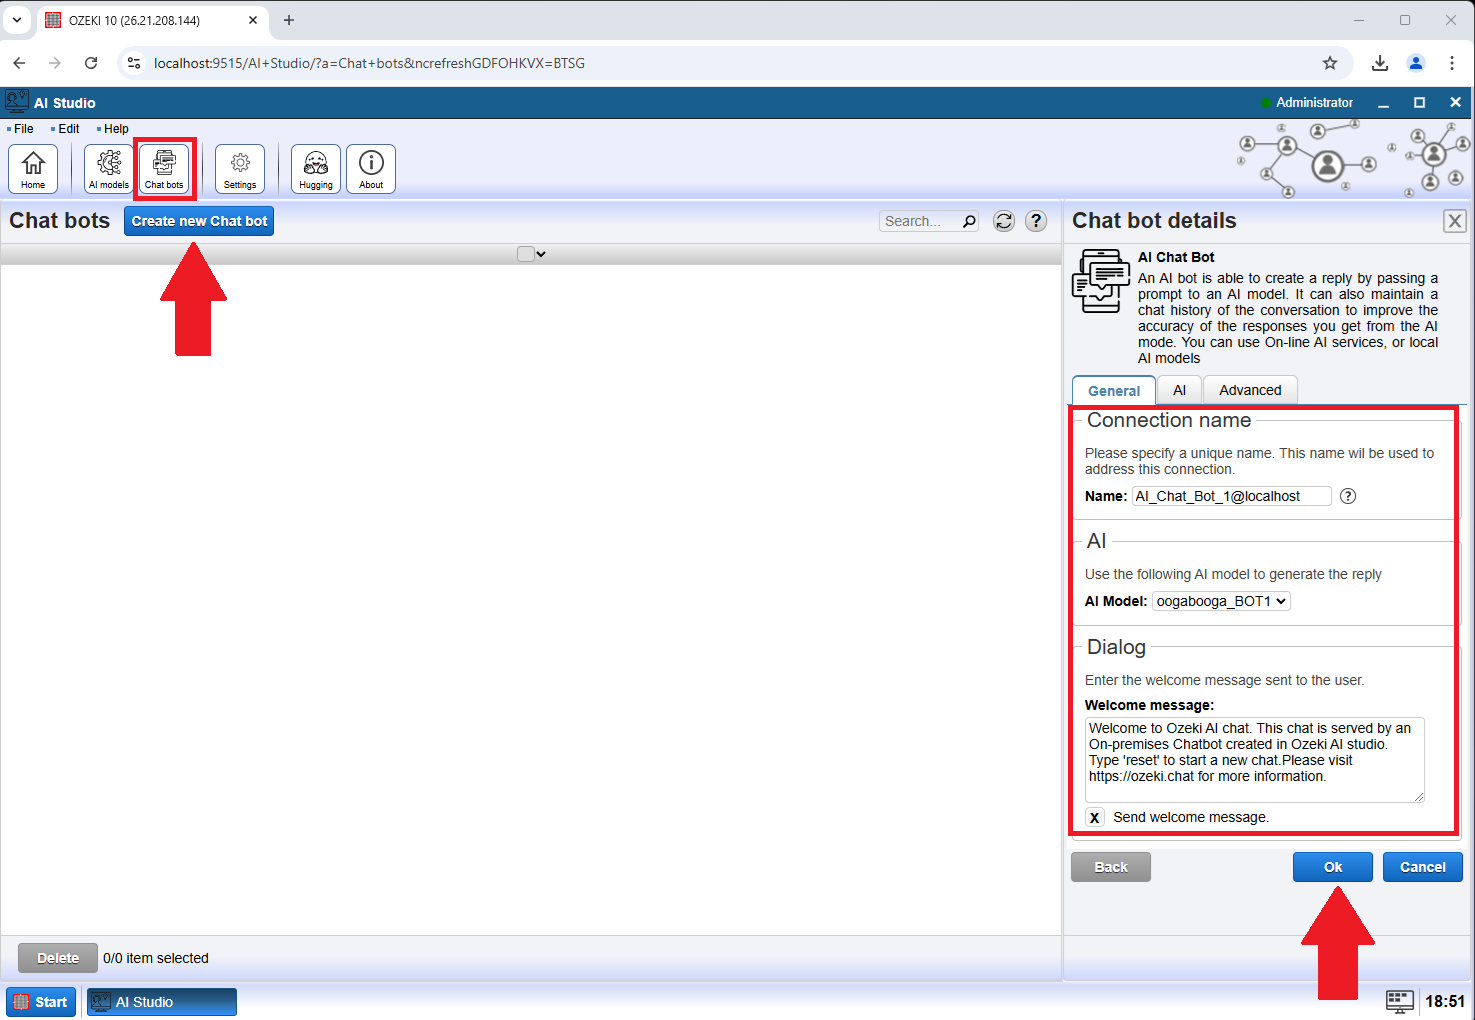
At the top left of your screen, find and click the Chat Bots icon. Directly below it, press the Create New Chat Bot button. On the right side, enter a name for your chatbot and choose the AI model you just created. Click OK to proceed. Figure 22 shows you an example for this step.
Step 5 - Try it in Ozeki Chat
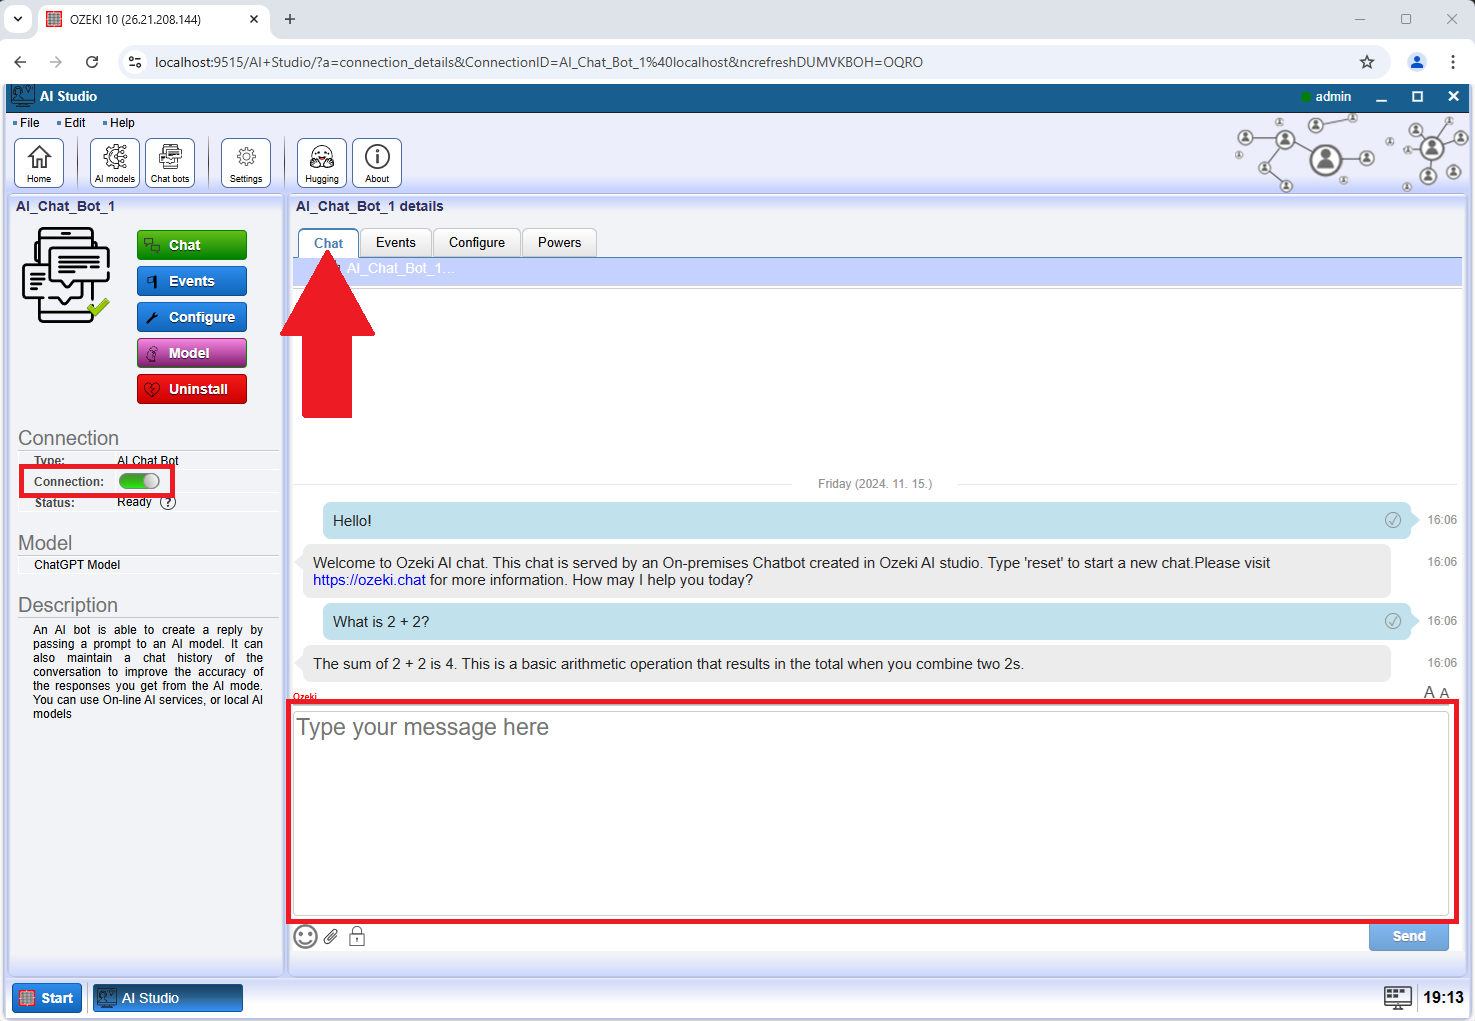
Select your chatbot to open its options, toggle the connection switch on the left to enable it, and navigate to the Chat section. Enter your prompt, and you'll receive an AI-generated response. For an example, check Figure 23.
Summary
This guide walks you through the entire process of setting up and using a
chatbot with Oobabooga and Ozeki AI Studio, starting from Python
installation to full integration. First, you’ll learn how to install Python,
followed by setting up the Oobabooga WebUI, which provides an intuitive
graphical interface for configuring your chatbot.
Next, you'll download your desired model from Hugging Face, set it up, and
enable it's API. Then, we'll test it by sending a request with Postman.
Finally, you'll connect your chatbot to Ozeki AI Studio, making it easy to
send and receive AI messages. This guide is perfect for beginners using
Ozeki’s simple graphical interface to create and interact with chatbots.

