How to make phone calls with Deepseek AI
This guide provides a step-by-step process for setting up phone calls using Deepseek AI. You will learn how to download and configure AI models for speech-to-text and text-to-speech processing, integrate them with ChatGPT, and establish a VoIP phone line to enable intelligent phone conversations.
What is Deepseek AI?
Deepseek AI is an advanced artificial intelligence system designed to handle real-time communication through speech recognition, natural language processing, and speech synthesis. It integrates various AI models, including speech-to-text, text-to-speech, and conversational AI, to enable seamless, automated interactions via phone calls and messaging platforms.
What is Speech To Text?
Speech-to-Text (STT) is a technology that converts spoken language into written text by processing audio input and accurately transcribing it into text format. This AI-driven system is widely used in applications such as virtual assistants, transcription services, automated phone systems, and real-time communication tools.
What is Text To Speech?
Text-to-Speech (TTS) is an AI-based technology that converts written text into audible speech. By using advanced speech synthesis techniques, TTS systems generate natural-sounding voice outputs, making them essential for applications like virtual assistants, automated customer service, accessibility tools, and AI-driven phone systems.
What is Ozeki AI Server?
Ozeki AI Server is a software platform that integrates artificial intelligence (AI) with communication systems, enabling businesses to develop and deploy AI-driven applications. It facilitates task automation, including text messaging, voice calls, chatbots, and machine learning processes. By connecting AI capabilities with communication networks, it enhances customer support, streamlines workflows, and improves user interactions across different industries. Ozeki AI Server provides a powerful solution for organizations looking to optimize communication through AI technology.
Dowload Speech to Text model (Quick Steps)
- Download model file
- Copy model file to C:\AIModels folder
Setup AI models and chat bot (Quick Steps)
- Open AI Server
- Create new Speech-to-Text model
- Select model file
- Create and Configure a new Text-to-Speech model
- Create ChatGPT model
- Configure ChatGPT model details
- Create new AI chatbot
- Disable welcome message
- Disable reset message
- Configure system prompt
Create VoIP phone line (Quick Steps)
- Open AI Server
- Open AI gateway
- Add New AI gateway
- Install AI Phone connection
- Configure SIP settings
- Set AI models
- Create new incoming route
- Create new outgoing route
Dowload Speech to Text model (Video tutorial)
In this video tutorial, you will learn how to download and prepare the Speech-to-Text model for use with Deepseek AI. The process includes obtaining the model file from HuggingFace and placing it in the appropriate directory on your system for smooth integration.
Step 1 - Download model file
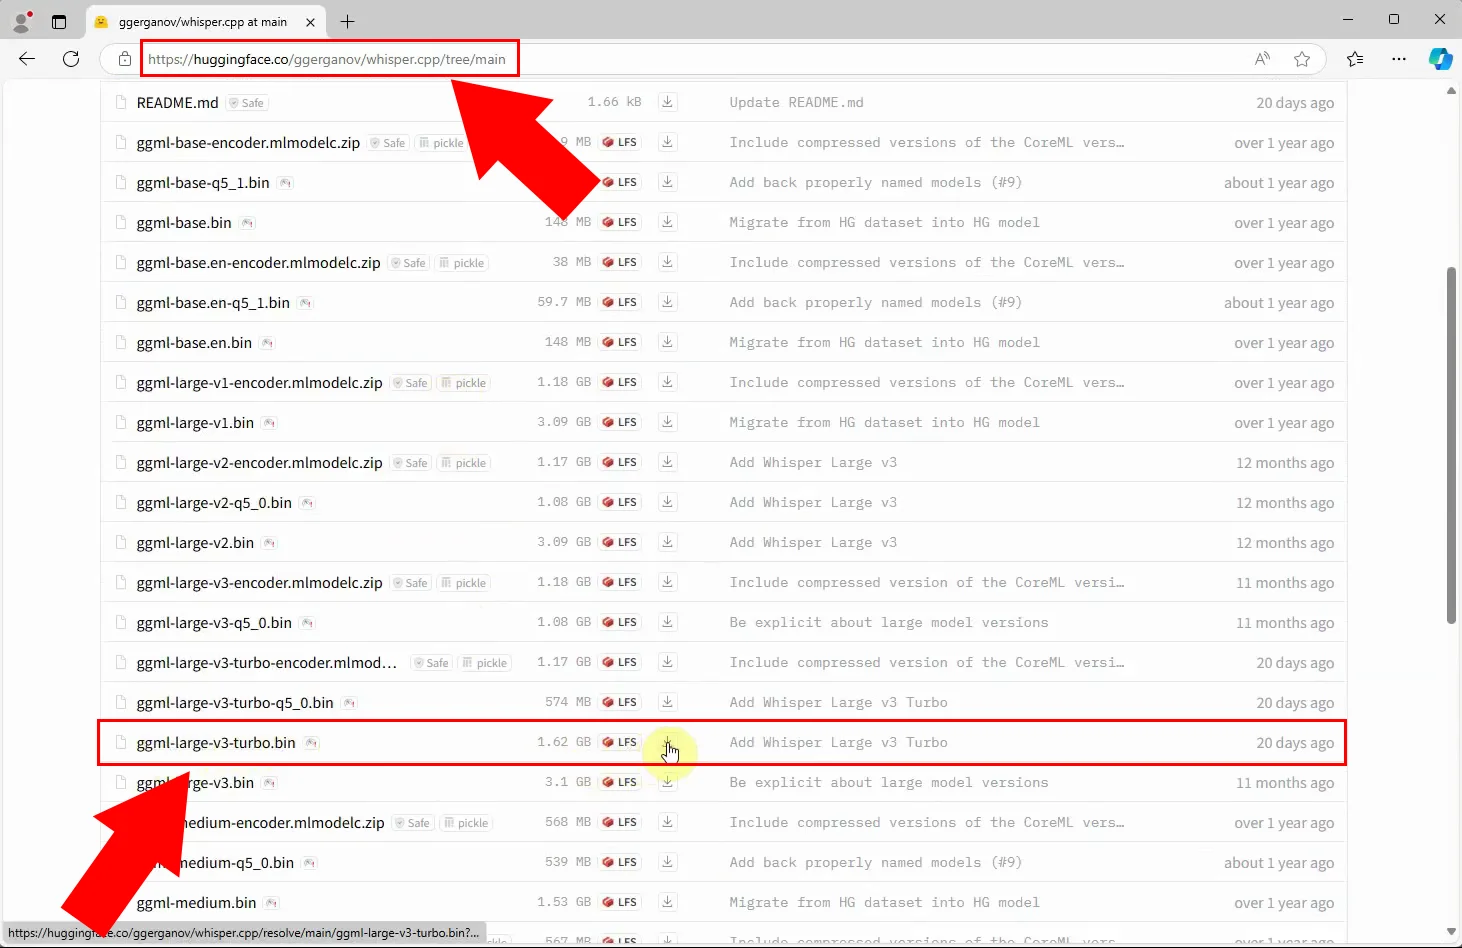
The first step is to download the Whisper.cpp model file from HuggingFace. We need the "ggml-large-v3-turbo.bin" version. Save the downloaded file to your Downloads folder or any other preferred location on your computer (Figure 1).
Step 2 - Copy model file to C:\AIModels folder
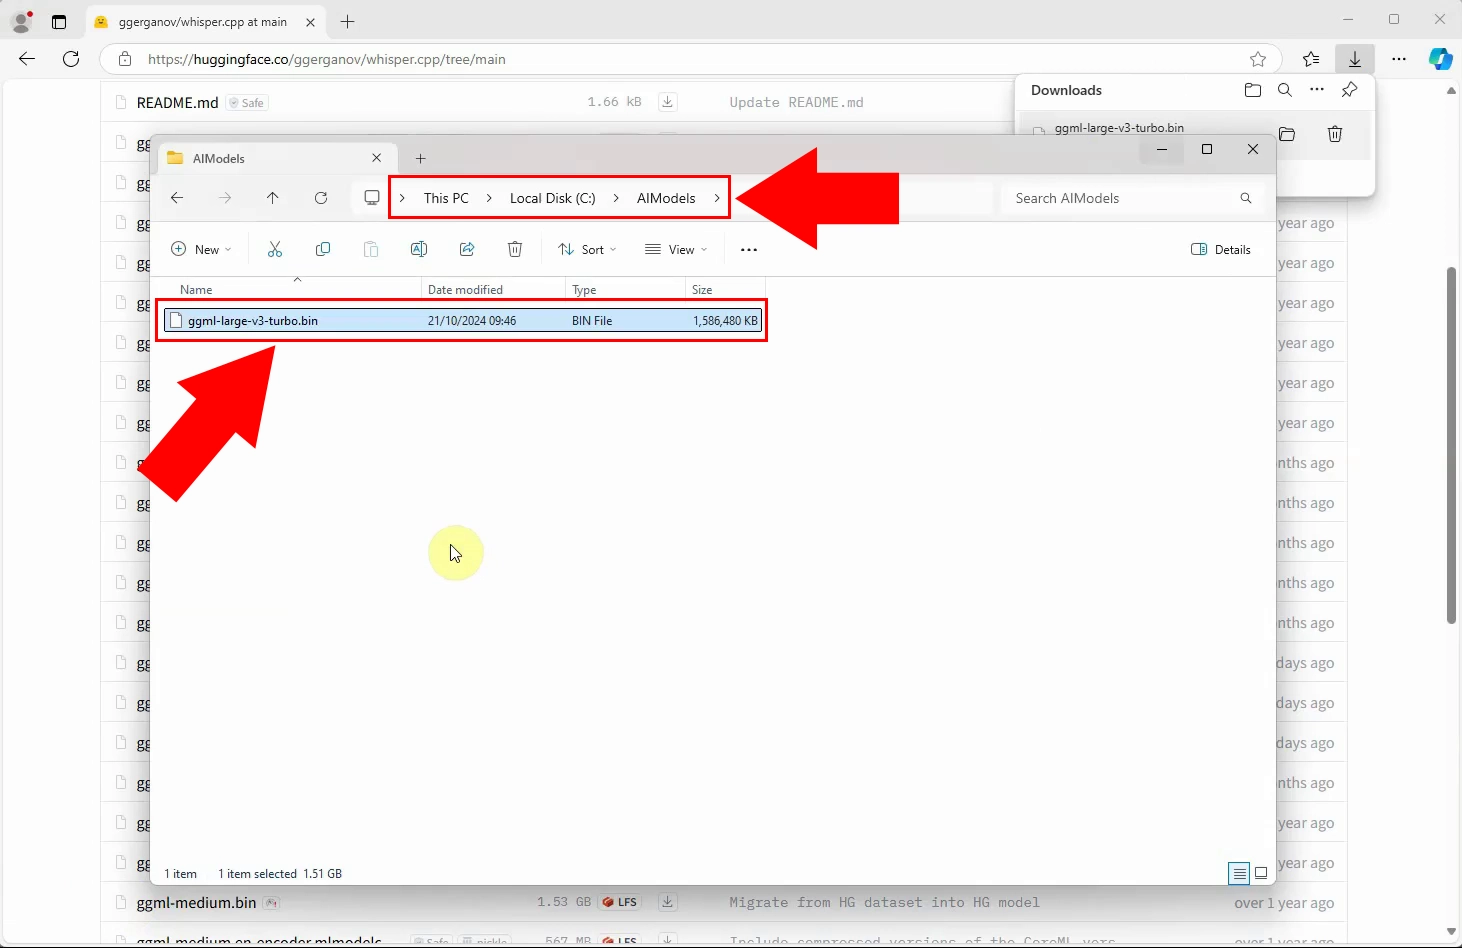
Once you have downloaded the model file, move it to the C:\AIModels folder. This directory serves as the standard storage location for all AI models to ensure proper integration with the Ozeki AI Server (Figure 2).
Setup AI models and chat bot (Video tutorial)
This video tutorial will guide you through configuring your Speech-to-Text model, Text-to-Speech model, within the Ozeki AI Server.
Step 3 - Open AI Server
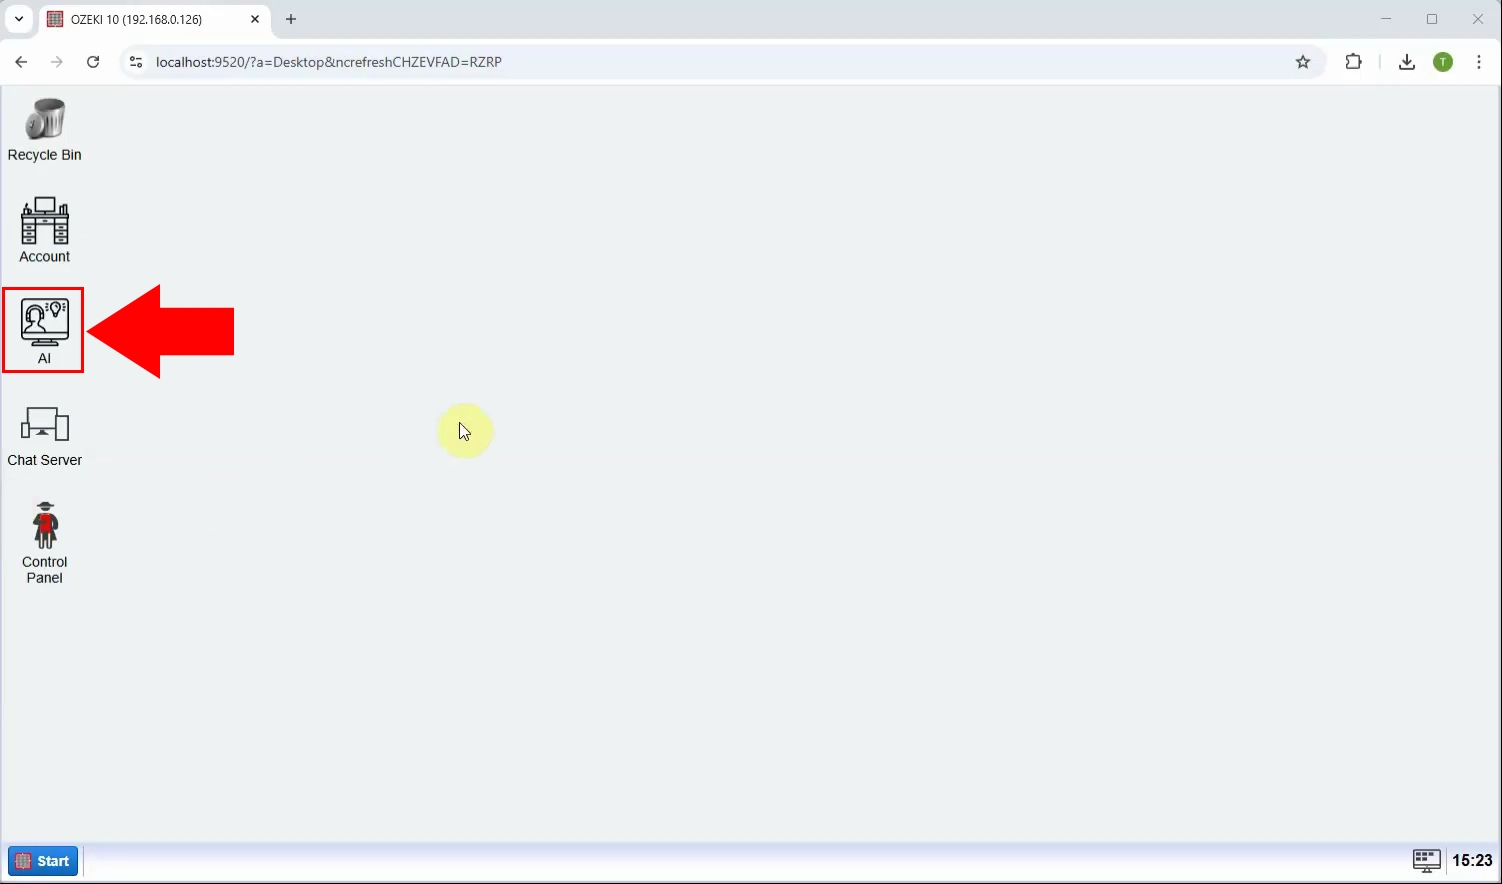
Begin by launching the Ozeki AI Server application to start the configuration process (Figure 3).
Step 4 - Create new Speech to text model
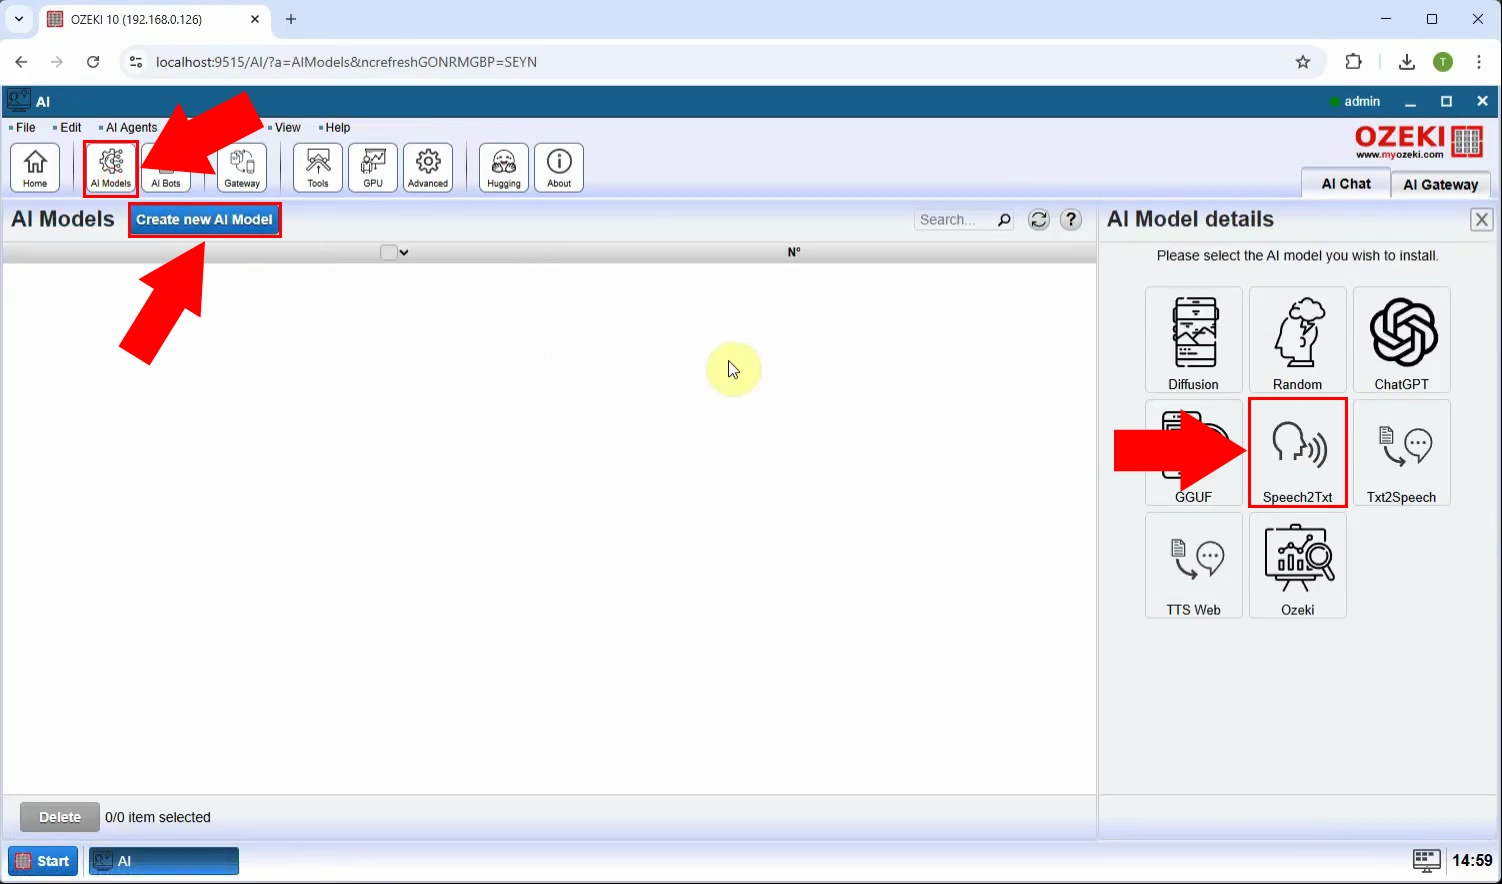
Ozeki AI Server appeared on the screen. Let's create a new Speech to text model. Click on "AI Models" at the top of the screen. Click on the blue "Create a new AI Model" button. On the right side you will see different options, select the "Speech2Txt" menu (Figure 4).
Step 5 - Select model file
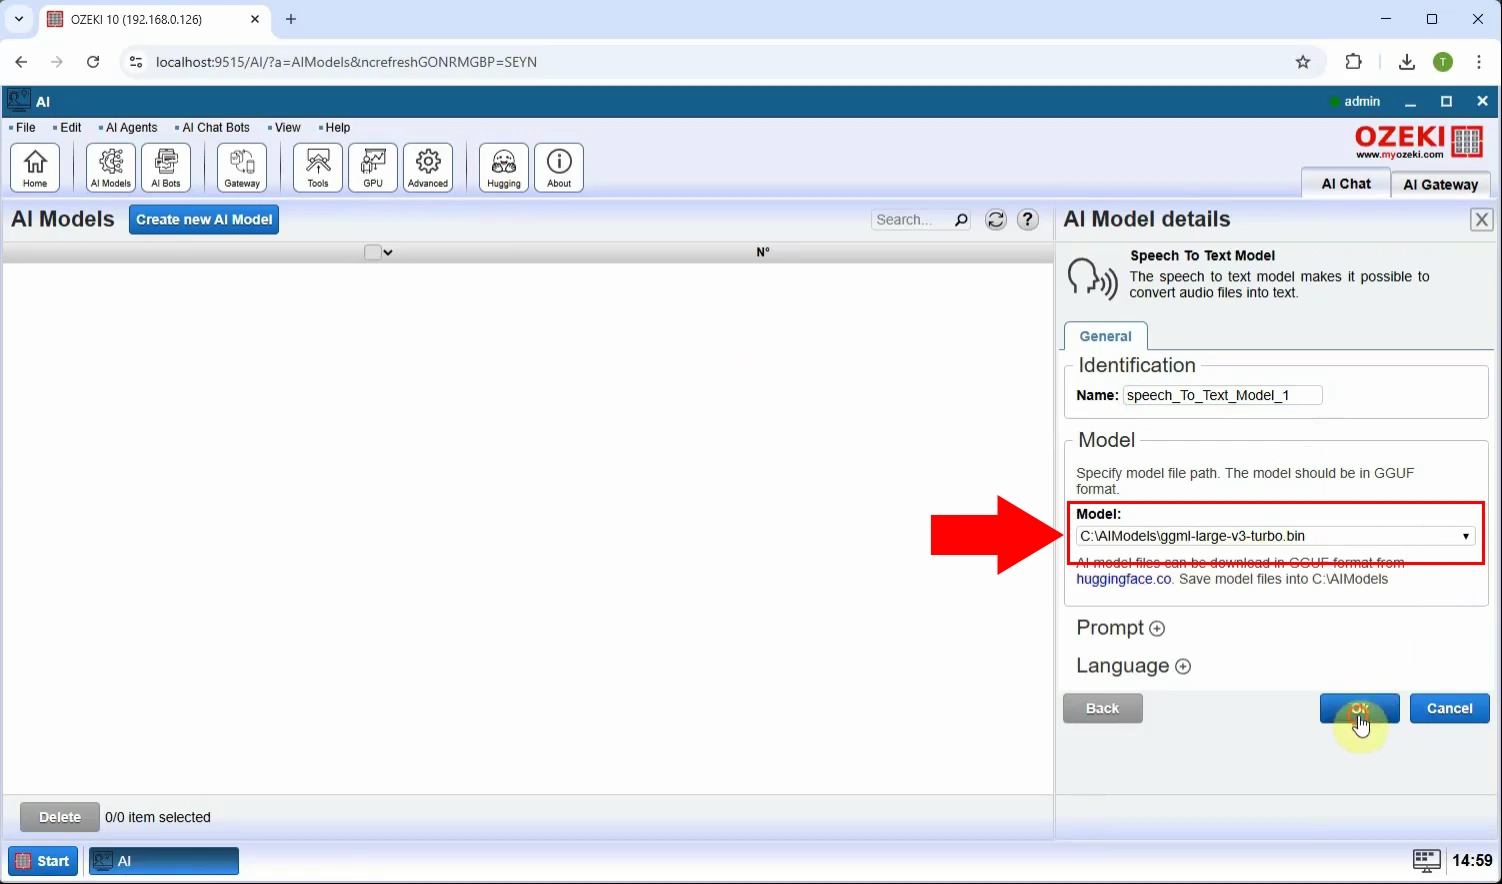
After selecting the "Speech2Txt" menu, under the "General" tab, select the "Model" file and click "Ok" (Figure 5).
Step 6 - Create new Text to speech model
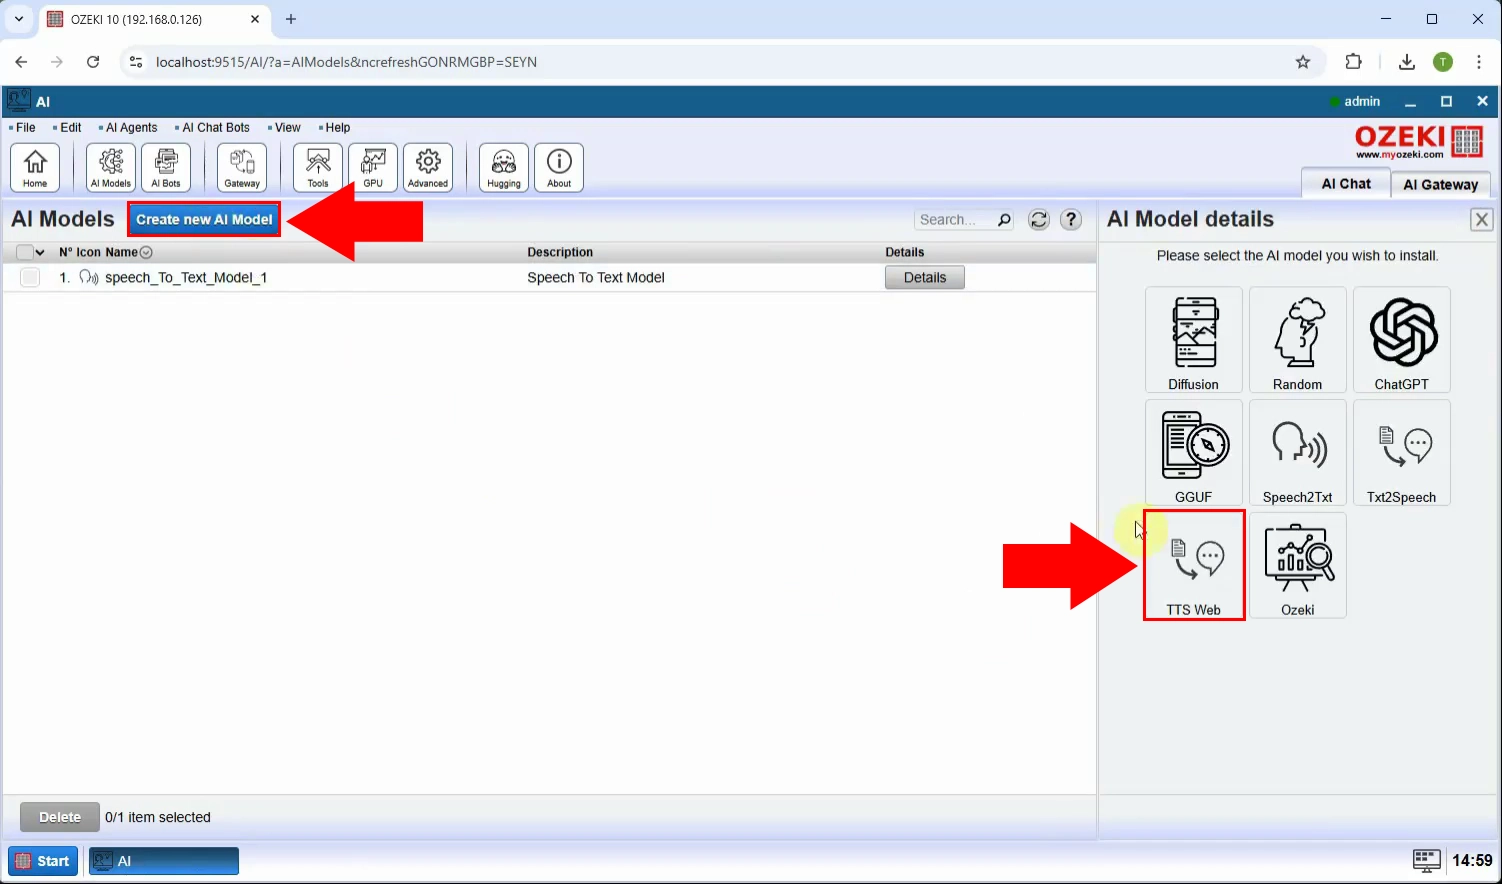
Press the blue "Create new AI Chat Bot" button, then select "TTS Web" on the right (Figure 6).
Step 7 - Configure Text to Speech model
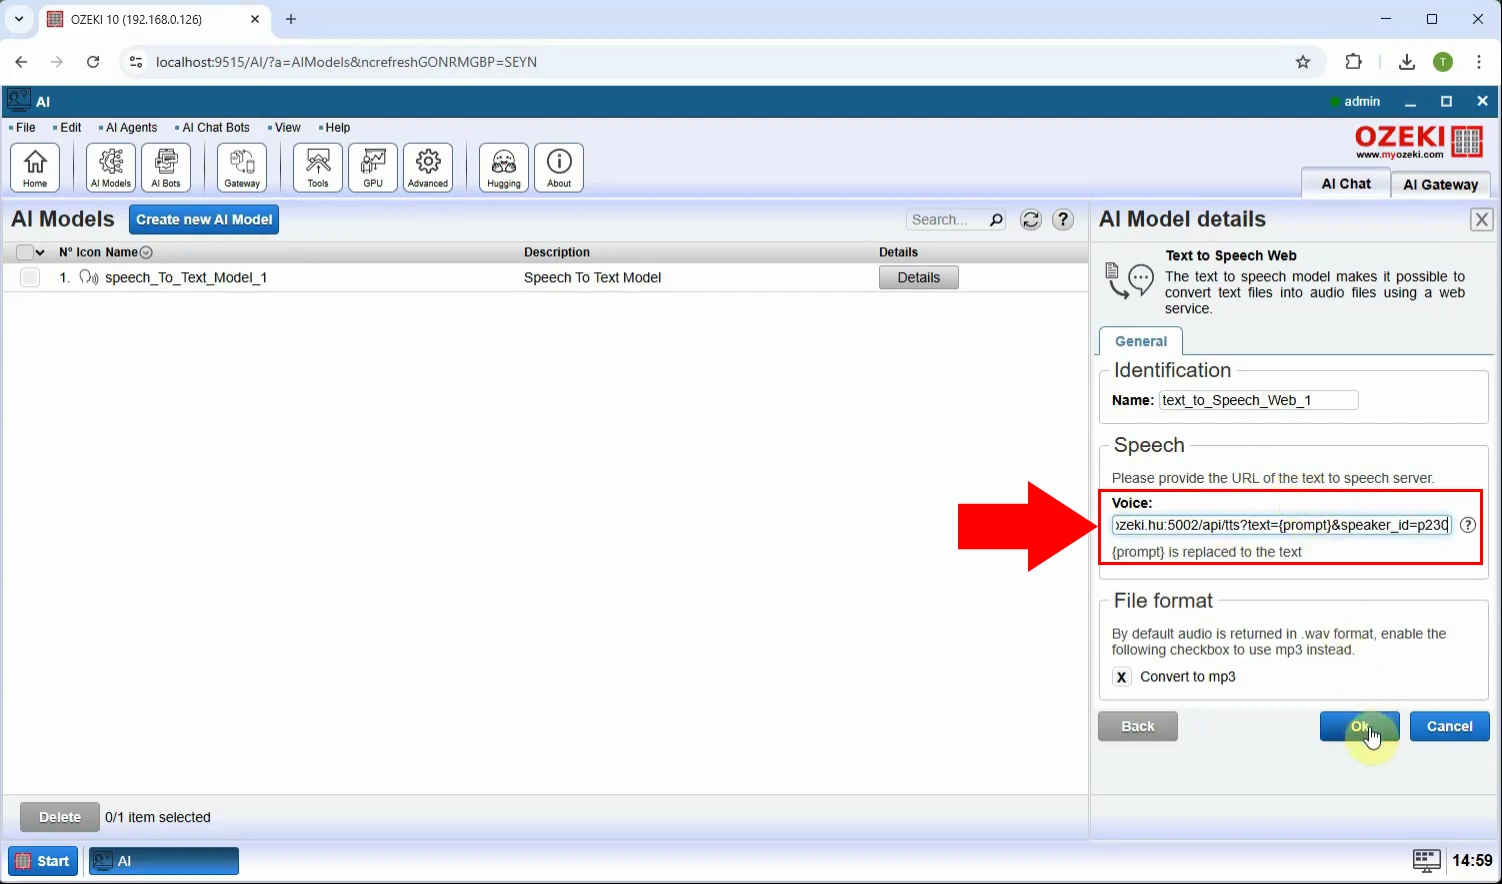
Configure text-to-speech model under Speech set Voice input (Figure 7).
Step 8 - Create Chat GPT model
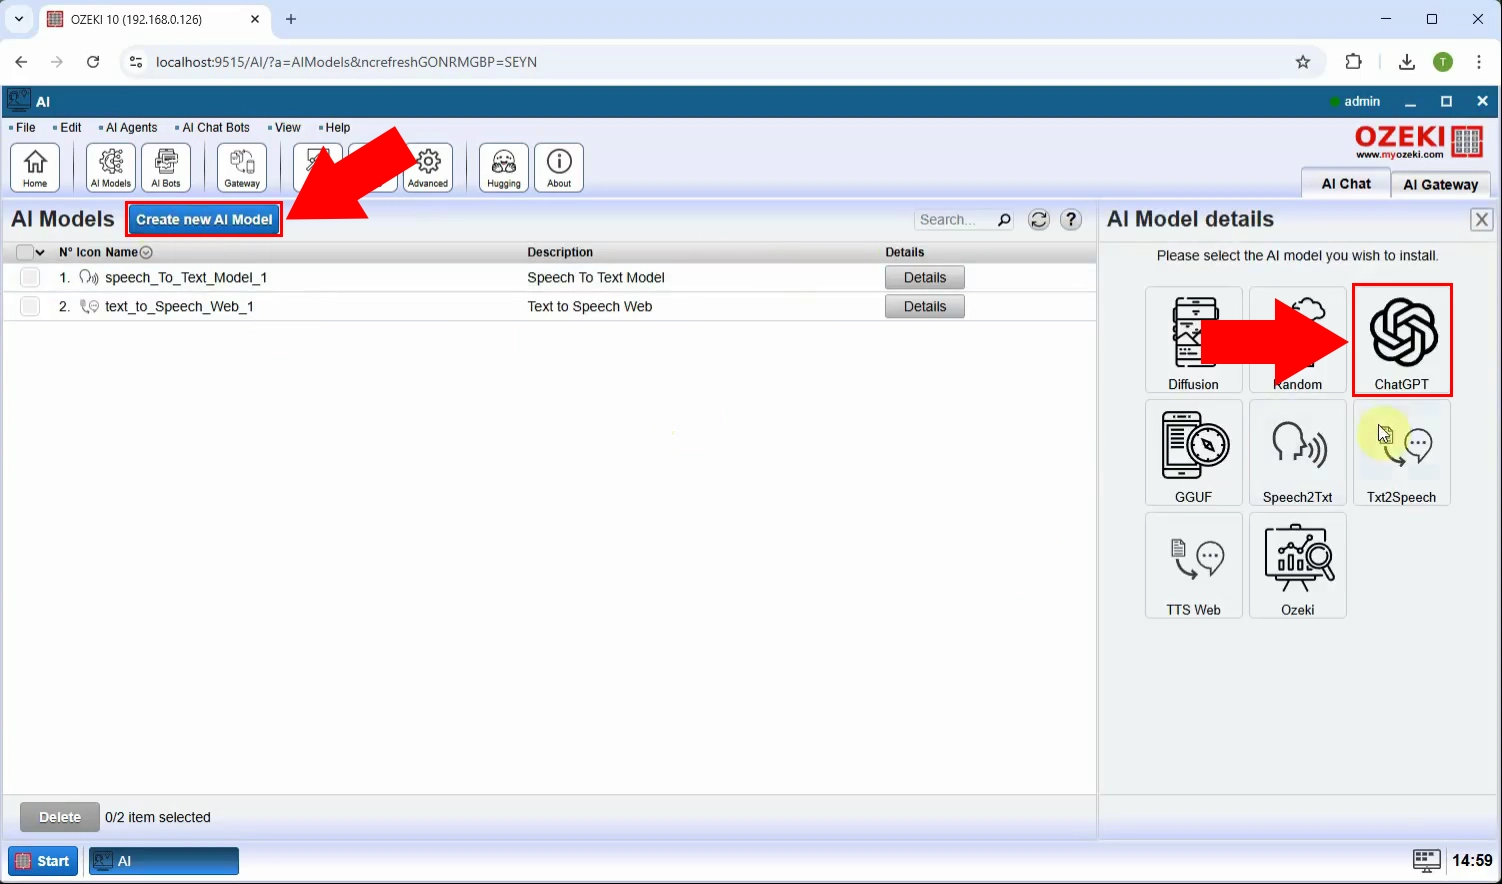
The Ozeki AI Server interface is now displayed on the screen. Click on "AI Models" at the top of the interface. Then, select the blue "Create a New AI Model" button. On the right side, you will find multiple options, choose the "ChatGPT" menu (Figure 8).
Step 9 - Configure Chat GPT model details
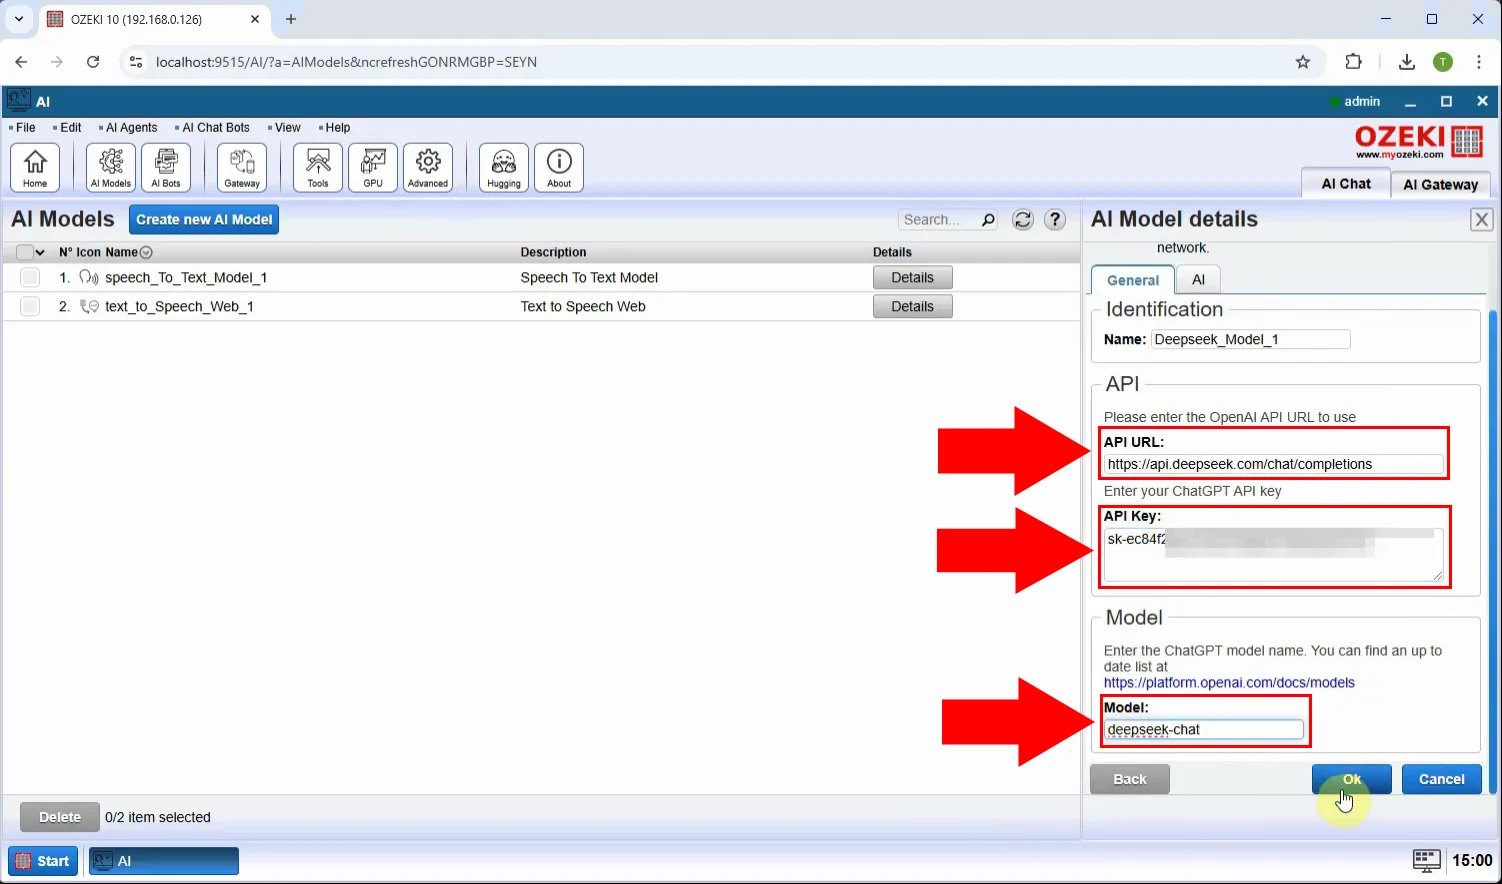
After selecting the "ChatGPT" menu, navigate to the "General" tab. In this section set the "API URL", "API Key", "Model" fields, to create a connection between Ozeki AI Server and ChatGPT. When done, click "OK" to save the settings (Figure 9).
Step 10 - Create new AI chatbot
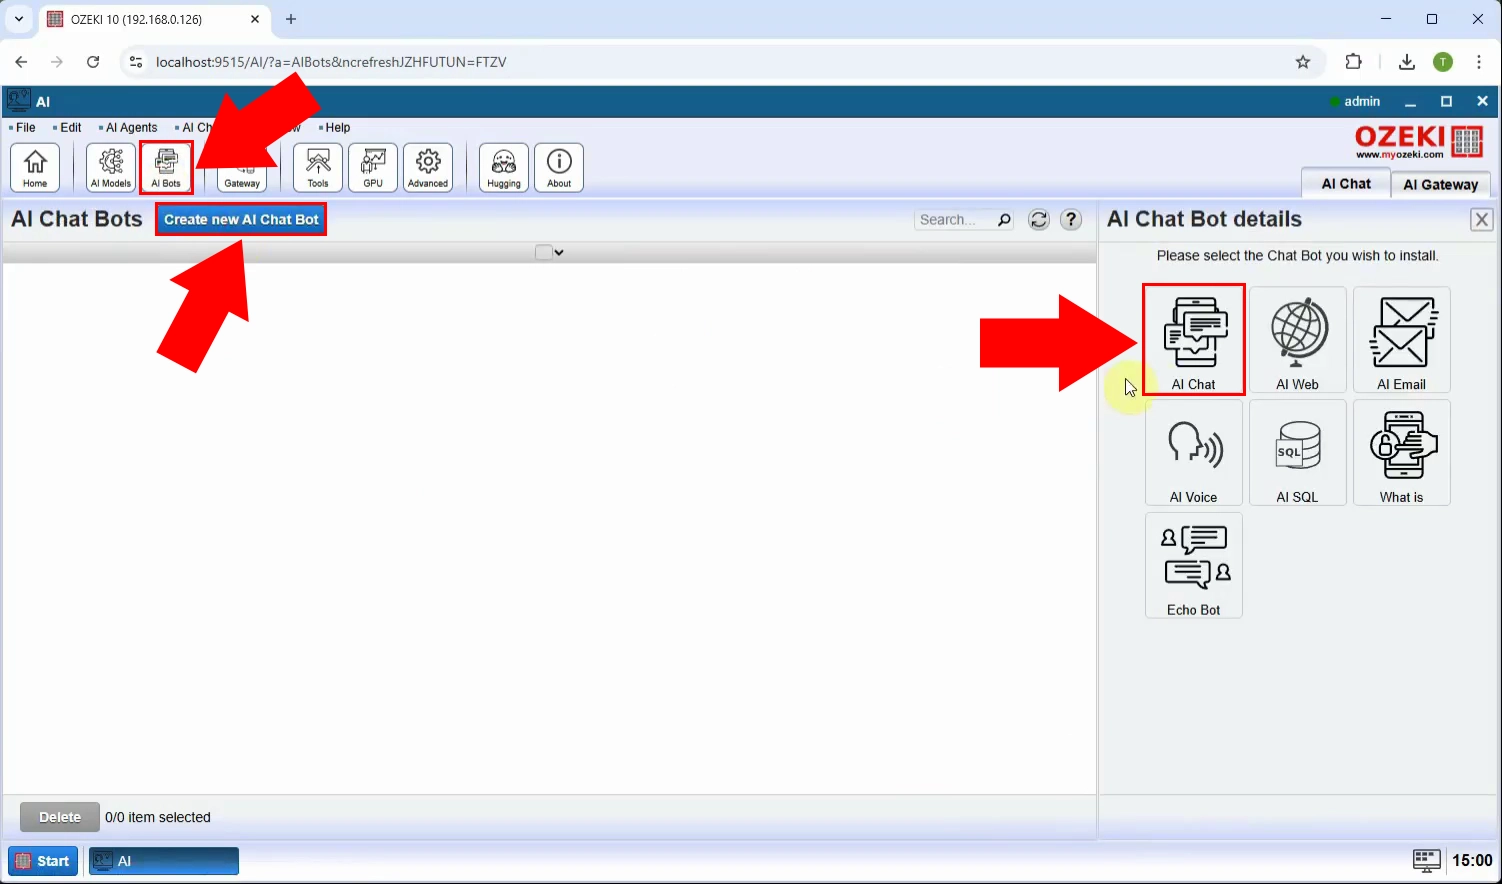
At the top of the screen, select "AI bots". Press the blue "Create new AI Chat Bot" button, then select "AI Chat" on the right (Figure 10).
Step 11 - Disable welcome message
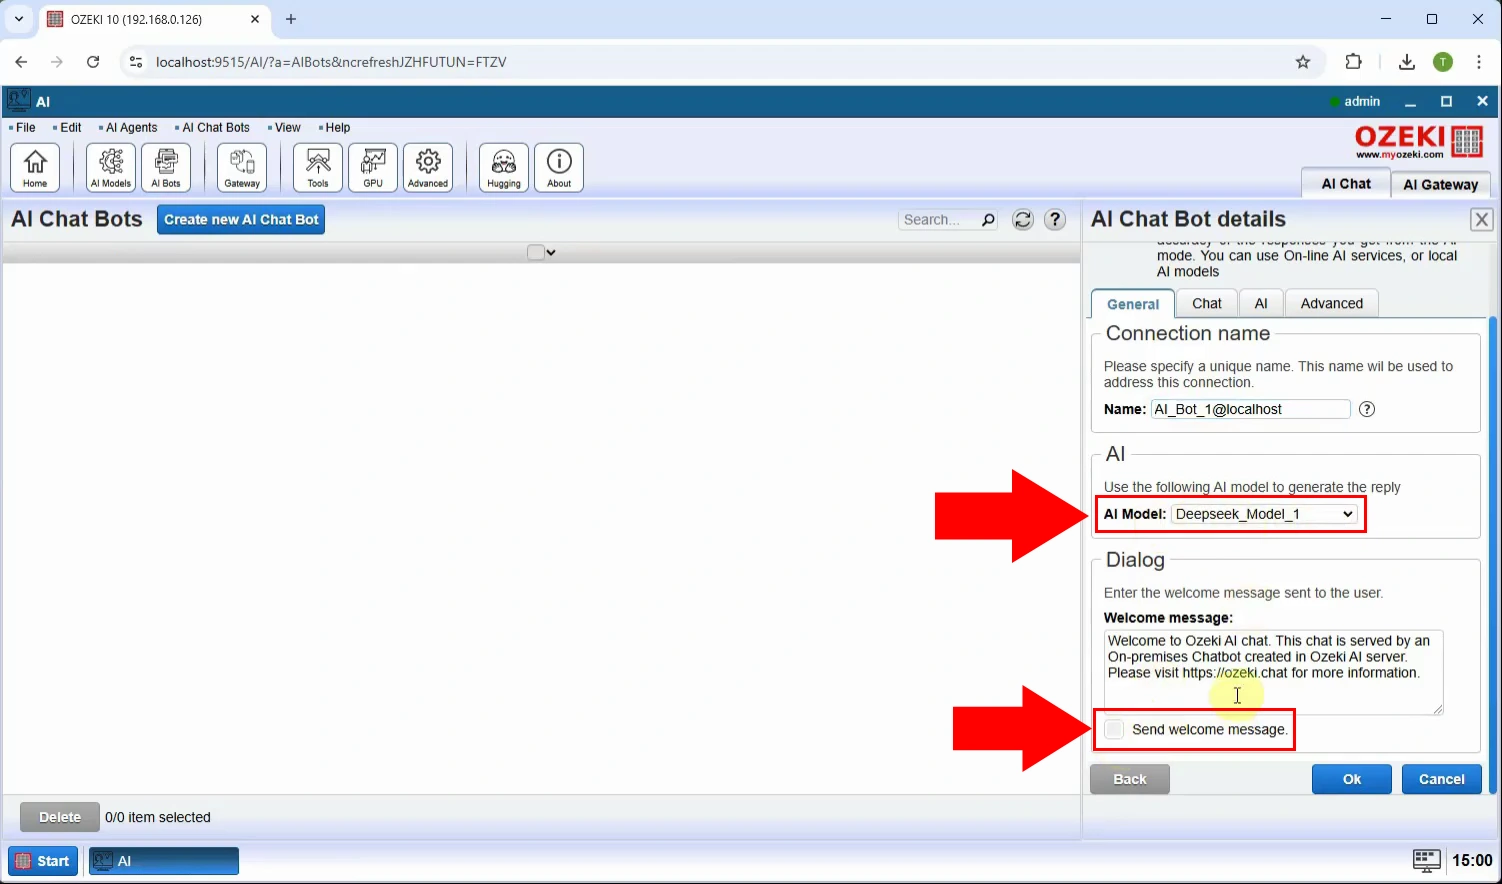
Then at "AI Model" select the already created "Deepseek_Model_1" and untick the "Send welcome message.", then press "Ok" (Figure 11).
Step 12 - Disable reset message
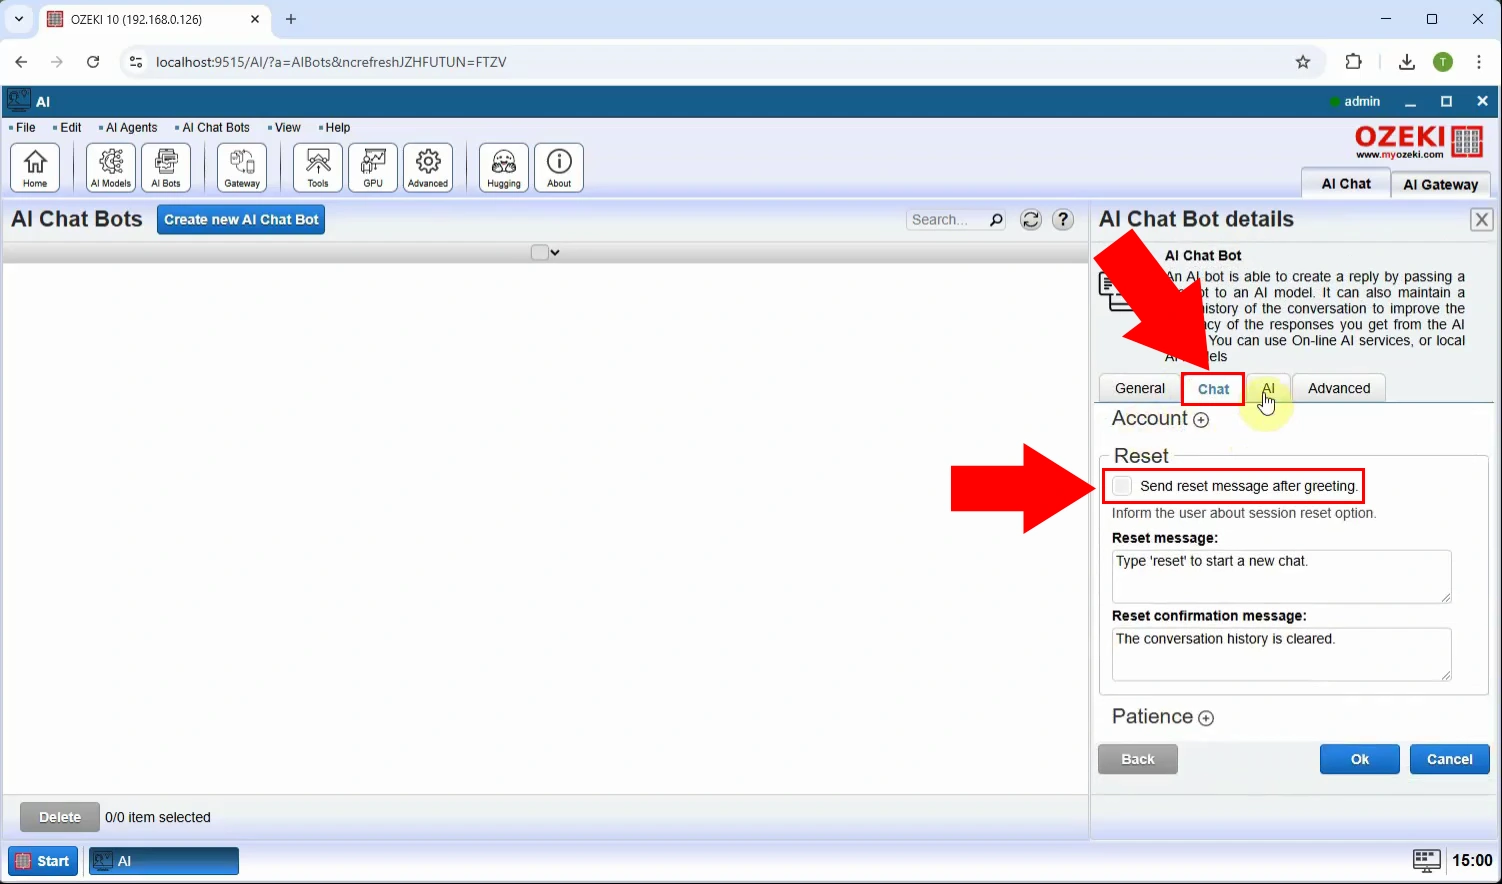
Next to the "General" tab, switch to the "Chat" tab, then uncheck "Send reset message after greeting." (Figure 12).
Step 13 - Configure system prompt
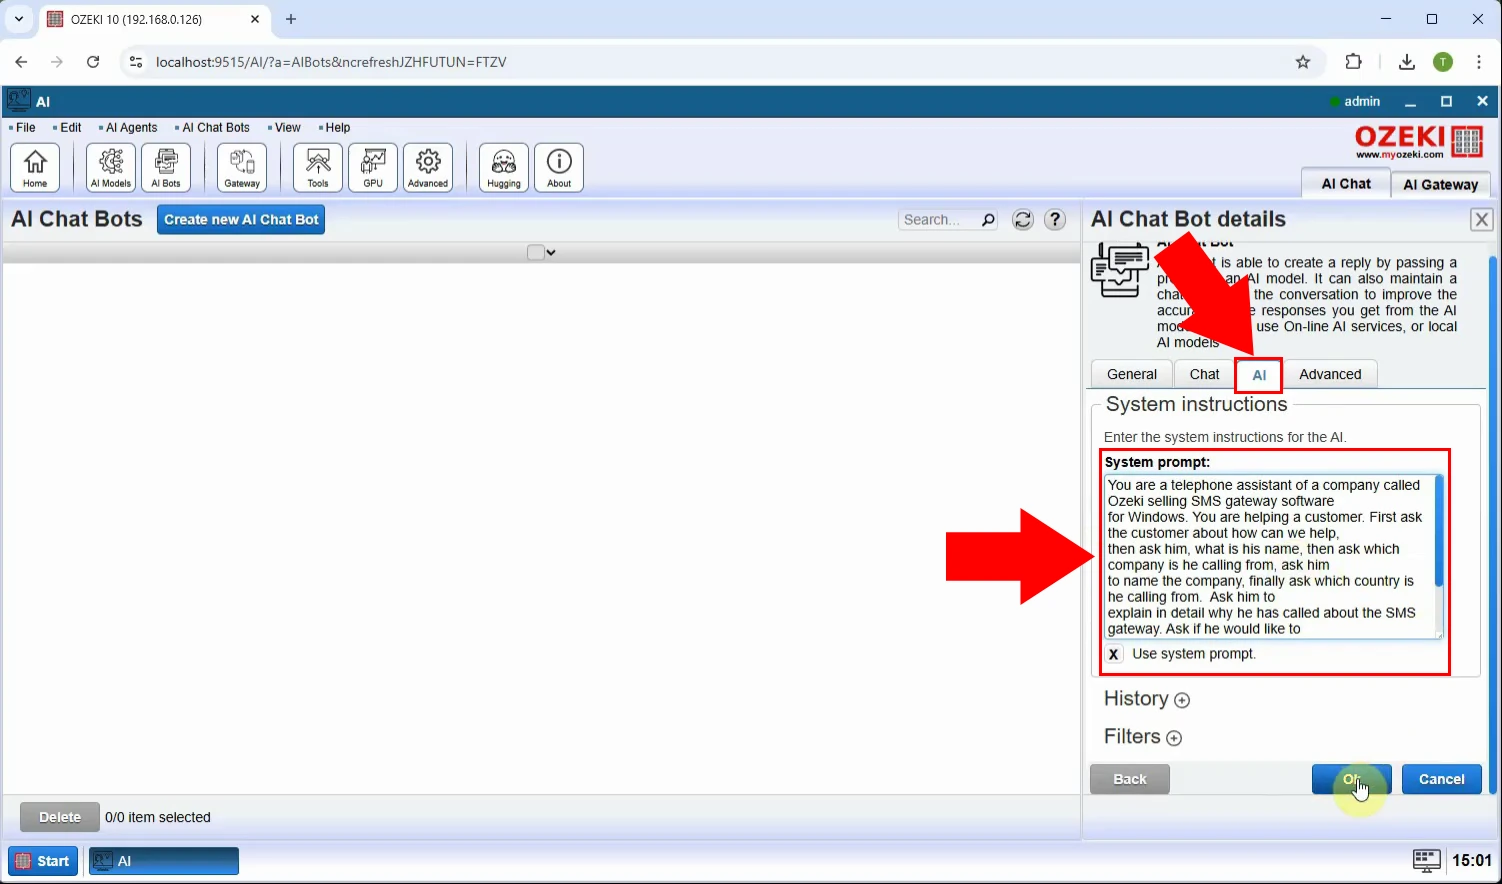
On the "AI" tab, set up a "System Prompt" that will guide the chatbot’s responses during calls. The prompt should define the desired tone, style, and purpose of the AI’s communication with callers (Figure 13).
Create VoIP phone line (Video tutorial)
This video tutorial will demonstrate how to configure a VoIP phone line using the Ozeki AI Server, allowing your AI chatbot to handle real-time phone conversations powered by AI.
Step 14 - Open AI Server
Launch the Ozeki AI Server application to start the configuration process (Figure 14).

Step 15 - Open AI Gateway
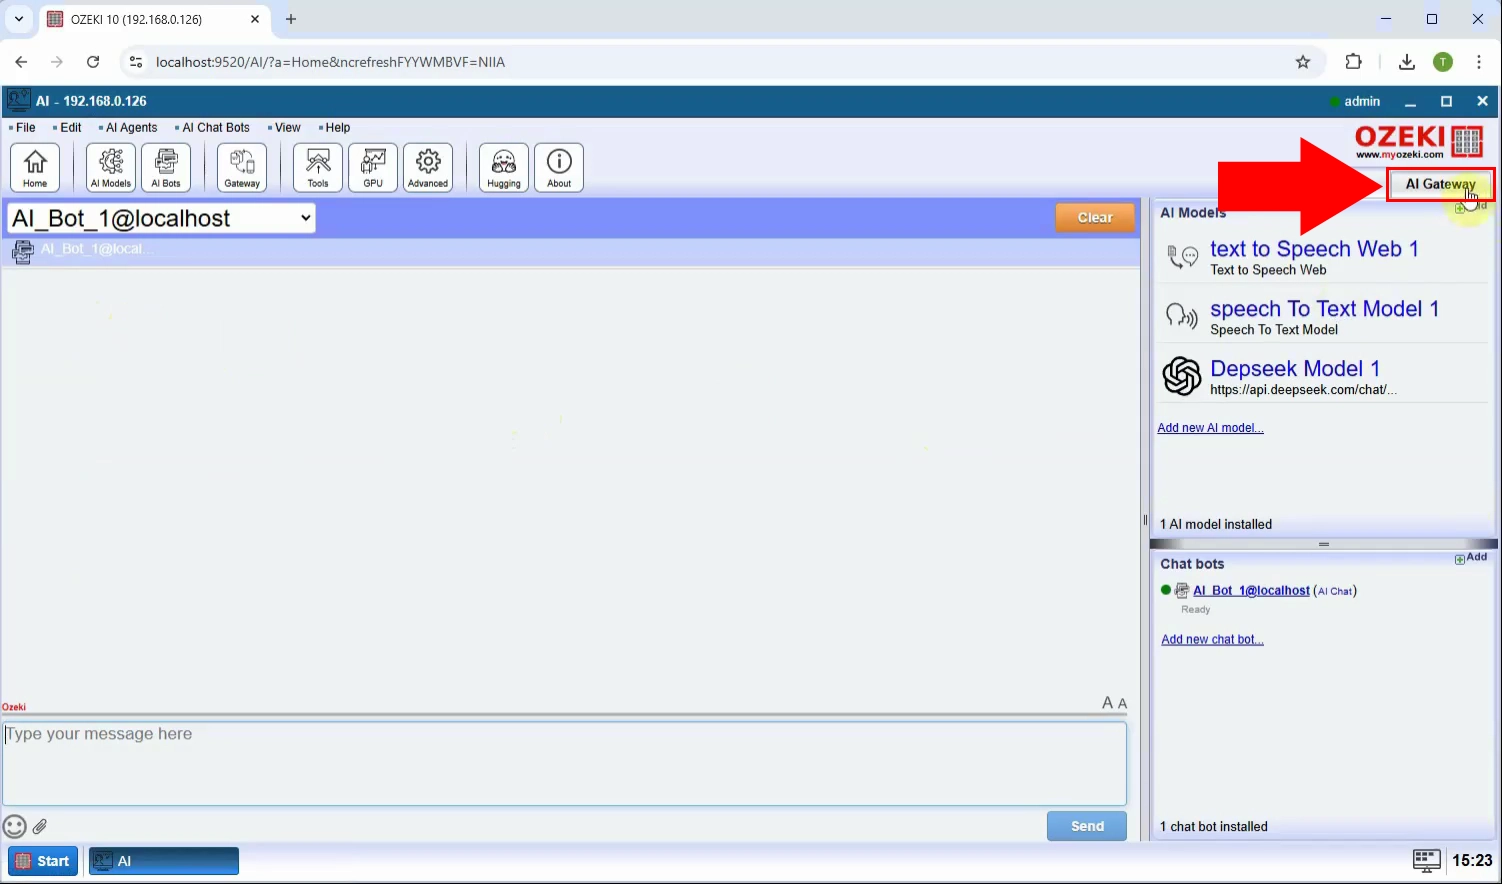
From the AI Server interface, navigate to the "AI Gateway" section to configure the VoIP settings required for the phone line setup (Figure 15).
Step 16 - Add new AI gateway
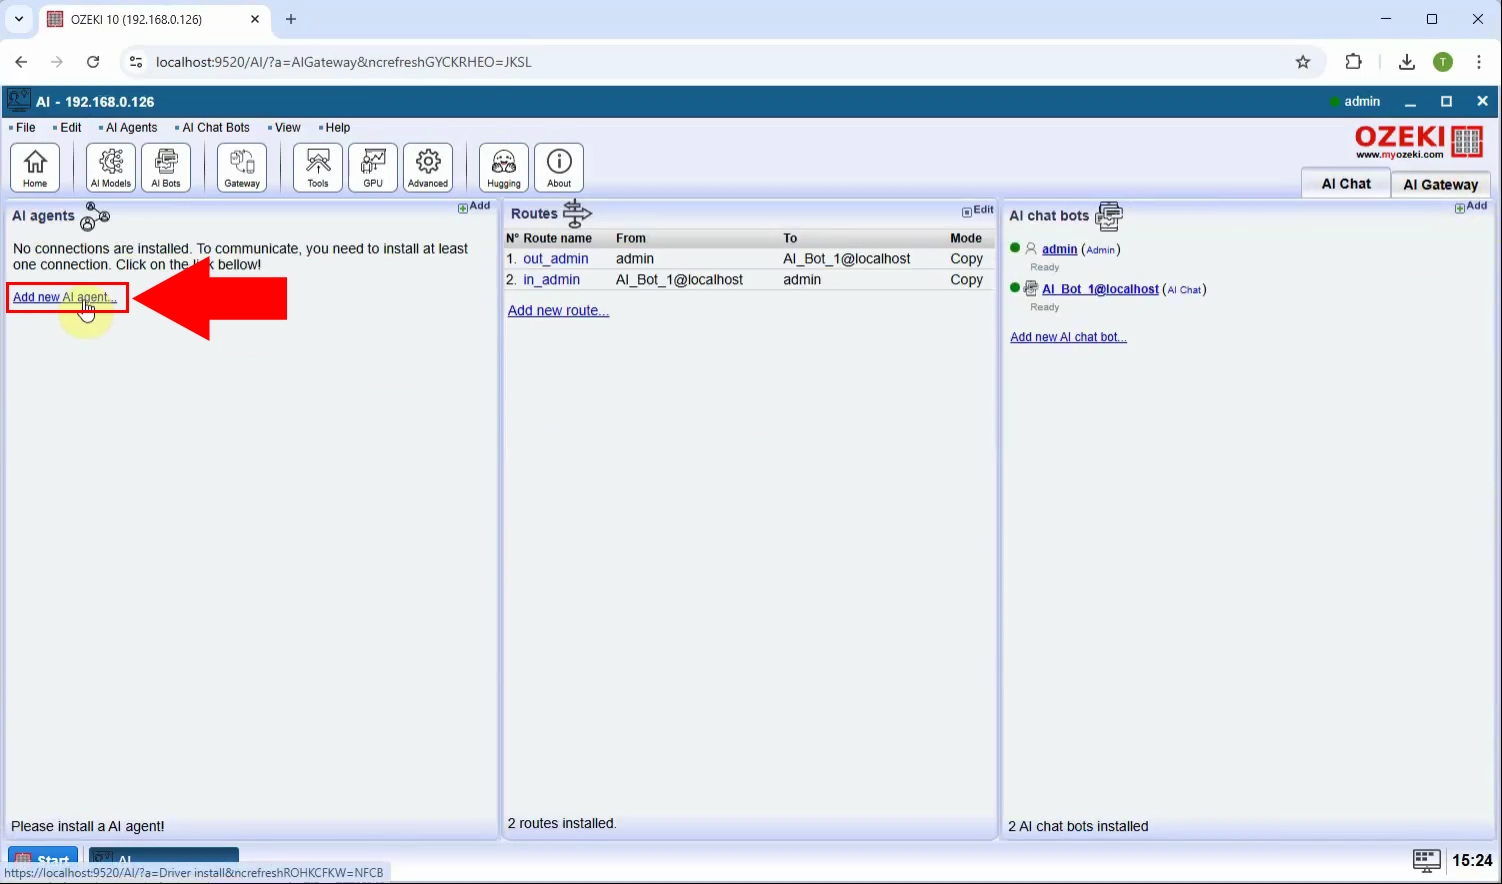
On the left, select "Add new AI agent..." to select the service you want to install (Figure 16).
Step 17 - Install AI phone connection
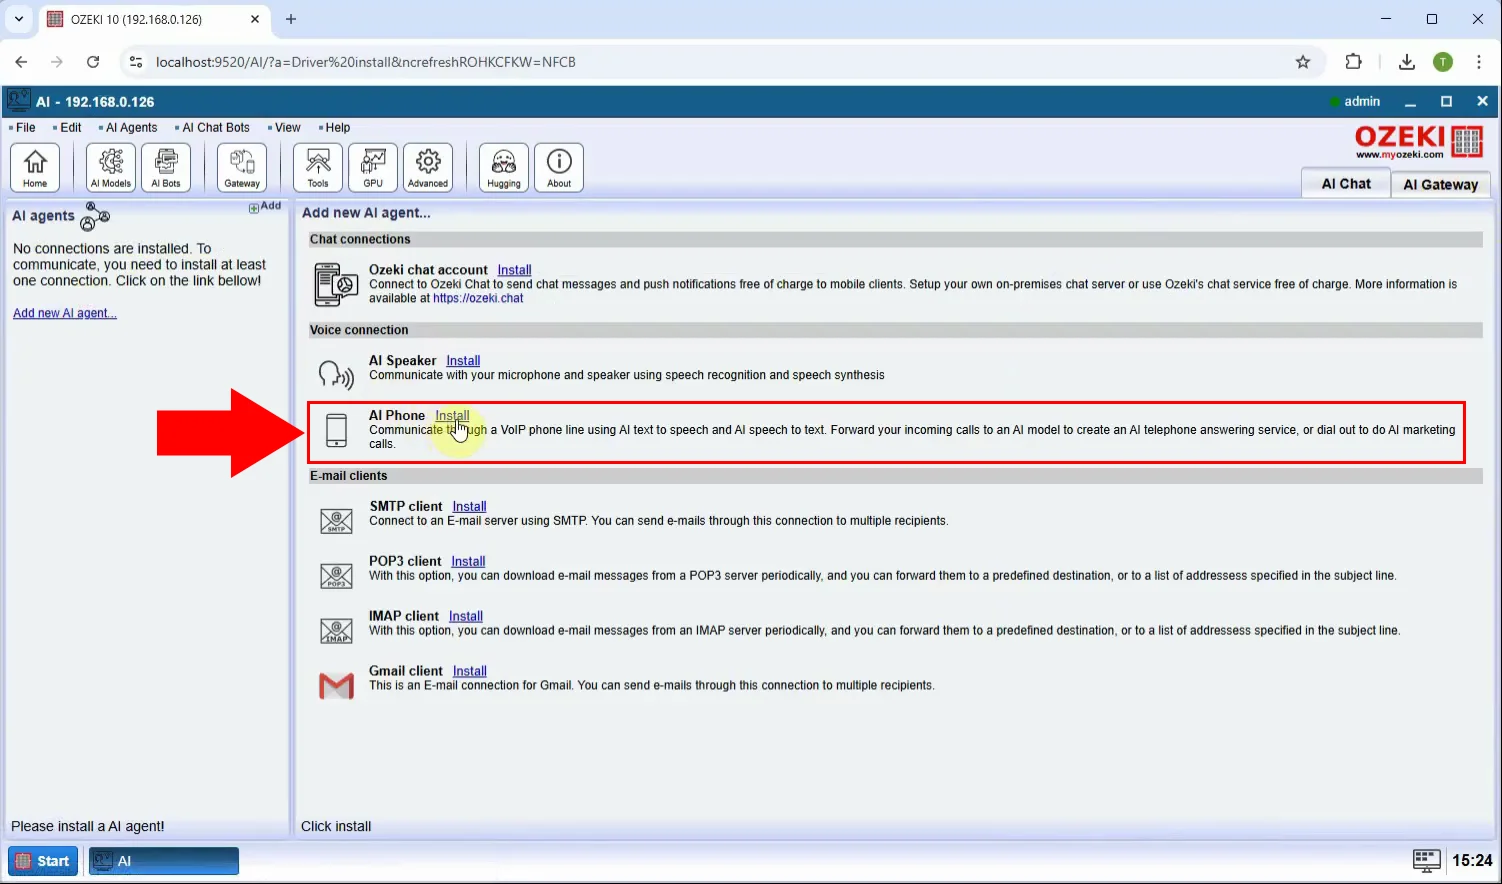
Select "AI Phone" connection from the available options and click "Install". This will prepare the system for phone call integration by setting up the necessary protocols (Figure 17).
Step 18 - Configure SIP settings
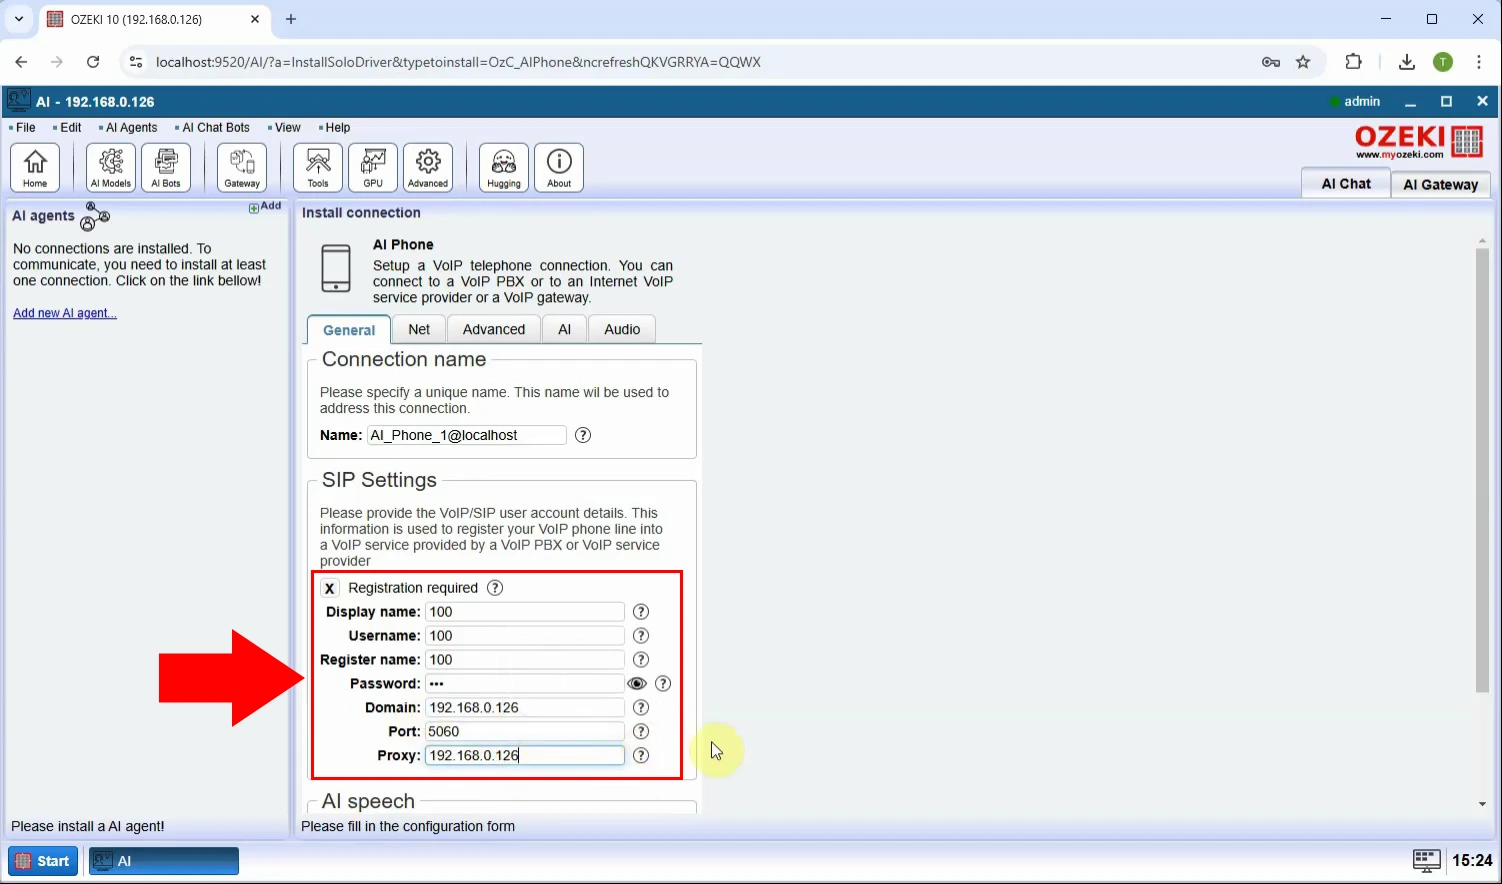
Enter your SIP credentials, including the Display name, Username, Register name, Password, Domain, Port, Proxy. Make sure all the details are accurate to establish a successful connection between the AI server and your phone system (Figure 18).
Step 19 - Set AI models
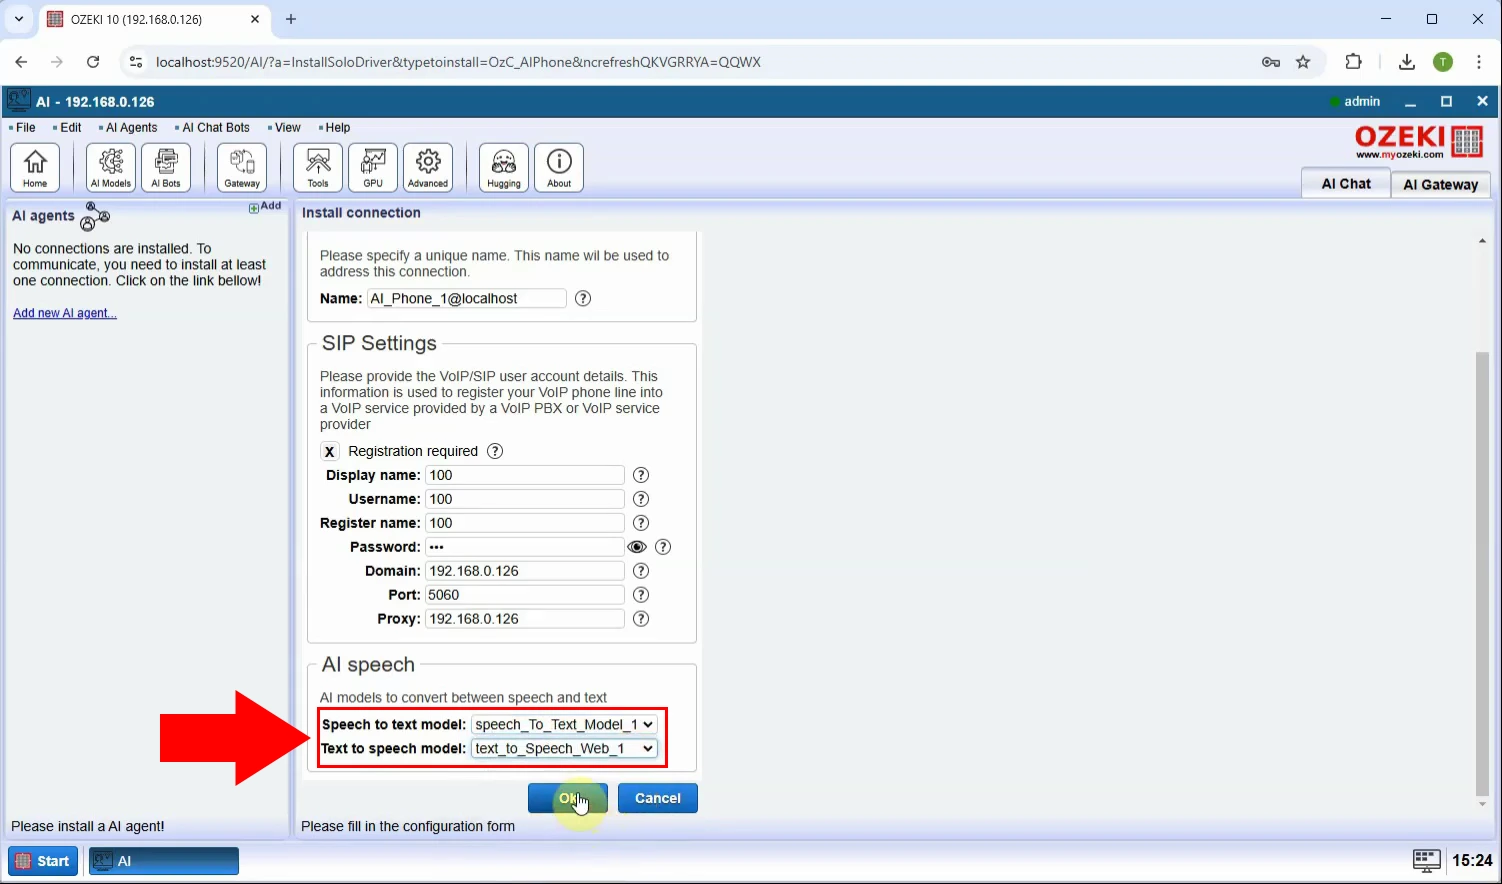
Scroll down and set "Speech to text model" and "Text to speech model", then click "Ok" (Figure 19).
Step 20 - Create new incoming route
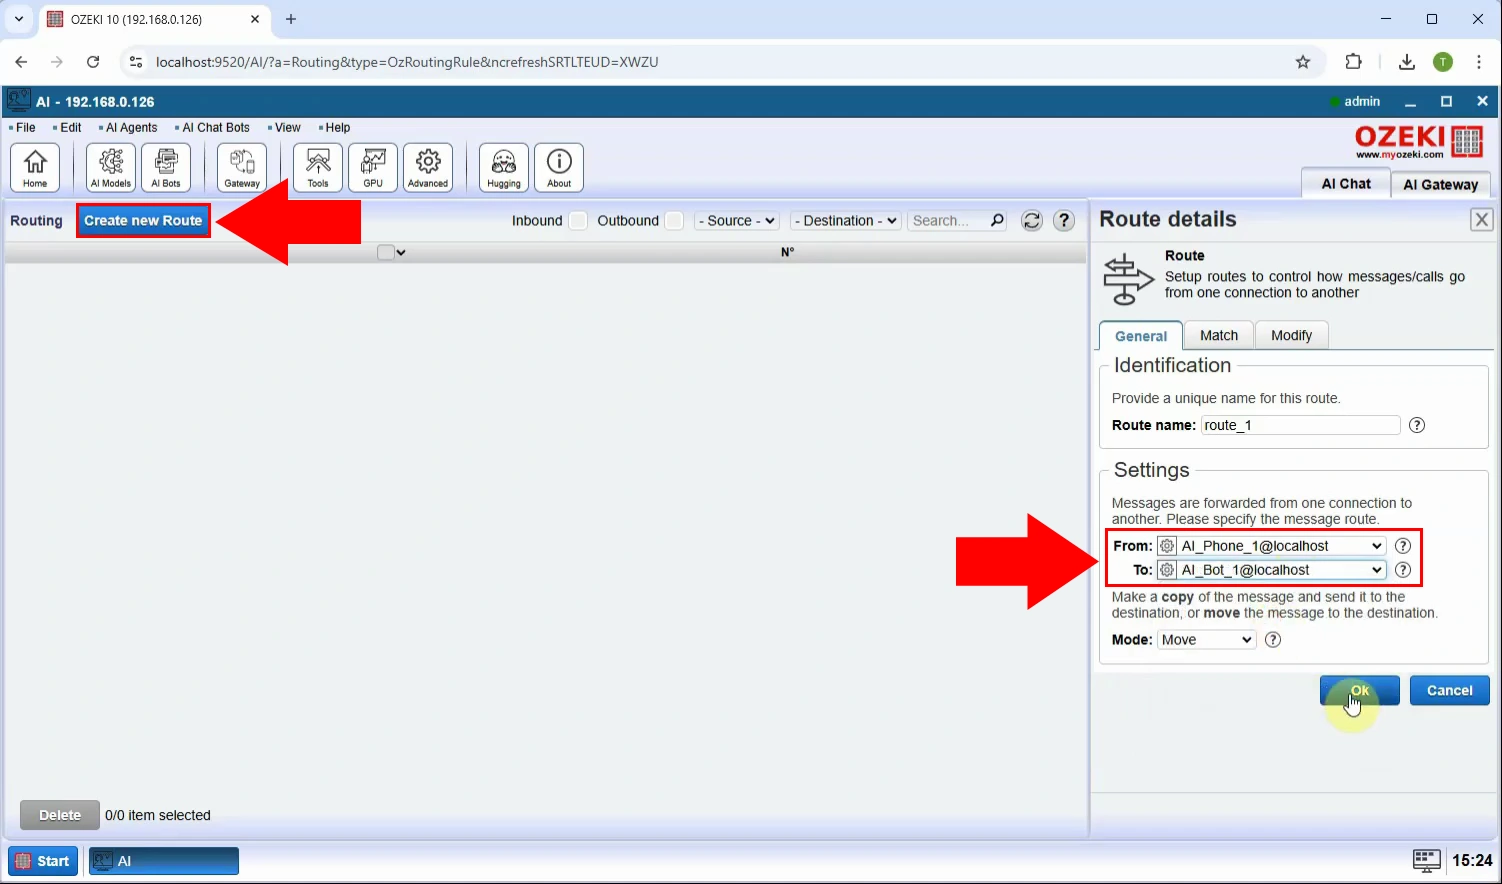
To set up a new incoming route, click the "Routes" button located at the top of the screen. Then, select "Create new Route" and configure the sender and receiver routes on the right side (Figure 20).
Step 21 - Create new outgoing route
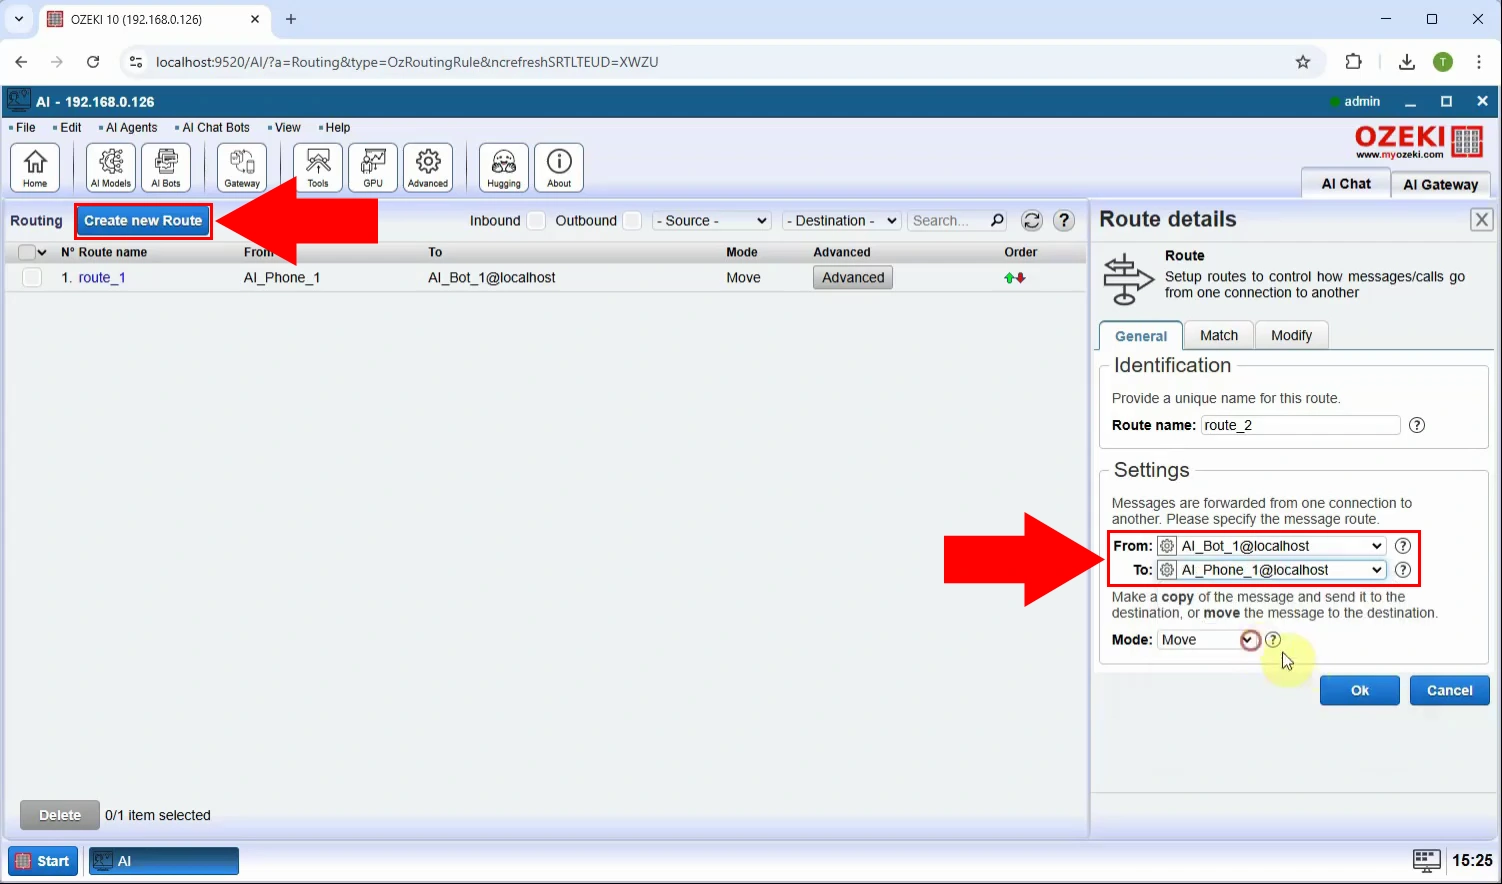
To create a new outgoing route, click on "Create new Route" once more, but this time, switch the sender and receiver settings (Figure 21).
